Use Genie Everywhere with Enterprise OAuth
by Hanlin Sun, Toussaint Webb and Naseer Ahamed
- Users can now ask natural-language data questions to Genie from the tools where they already work with our robust extensibility features—APIs, SDK, MCP, and Copilot Studio integrations.
- Use enterprise OAuth to ensure every Genie conversation is securely authenticated and governed with the right data permissions, no matter where your end users are asking questions.
- Learn how to scale trusted conversational analytics across your organization with a step-by-step guide on two common use cases: Bring Genie into Microsoft Teams and Embed Genie into your custom web apps.
Intro
Democratizing data starts with making insights easy and secure to access. With Databricks Genie, users can now talk to their data directly from the tools they already use: Teams, Slack, Confluence, or custom web apps. Whether you’re using our native Copilot Studio/Foundry integrations or building with the Genie Conversation APIs/SDK, Genie can now bring natural-language analytics into everyday workflows. Behind the scenes, OAuth can be applied to securely authenticate each user and enforce data access permissions.
Previously, we saw customers like The AA and Casas Bahia independently build their own Genie integrations into Microsoft Teams and internal apps. Our robust extensibility suite now makes this experience easier, faster and more scalable.
In this blog, we’ll walk through two common ways to roll out Genie with enterprise OAuth across your organization:
- Bring Genie into Microsoft Teams with our Copilot Studio integration
- Embed Genie into your custom web apps with Genie Conversation APIs
Bring Genie into Microsoft Teams
Ad-hoc data questions come up all the time during group conversations. With Databricks Genie’s native Copilot Studio integration, your users can now get answers the moment questions arise directly in Microsoft Teams. To leverage this integration, follow the steps below:
Pre-requisites
- Ensure that you have a target Genie space that is curated according to our best practices to deliver the highest quality.
- End users/service principals must have access to the target Genie space (at least CAN VIEW), SELECT privileges on the space’s Unity Catalog data, and CAN USE permission on the space’s SQL compute. End users can optionally be assigned the Consumer Access entitlement for streamlined “read-only” experience.
Step 1: Connect Azure Databricks to Power Platform
The first step in enabling Genie in Microsoft Teams is to Connect Azure Databricks to Power Platform (documentation). In your Microsoft Power Apps, click Connections and select Azure Databricks, or Databricks if you use AWS/GCP. Configure the following fields:
- To ensure each end user authenticates into Databricks with their own identity, select OAuth as the Authentication Type.
- For Server Hostname and HTTP Path, go to the workspace where your target Genie space is. Select a SQL warehouse and open Connection Details to retrieve this information (does not need to be the same SQL warehouse as the one attached to your Genie space).
Step 2: Connect Genie spaces to your Copilot Studio agent
Next, you’ll connect your Genie space to Copilot Studio (documentation). Our integration handles all of the API and MCP logic so the connection can be made in just a few clicks.
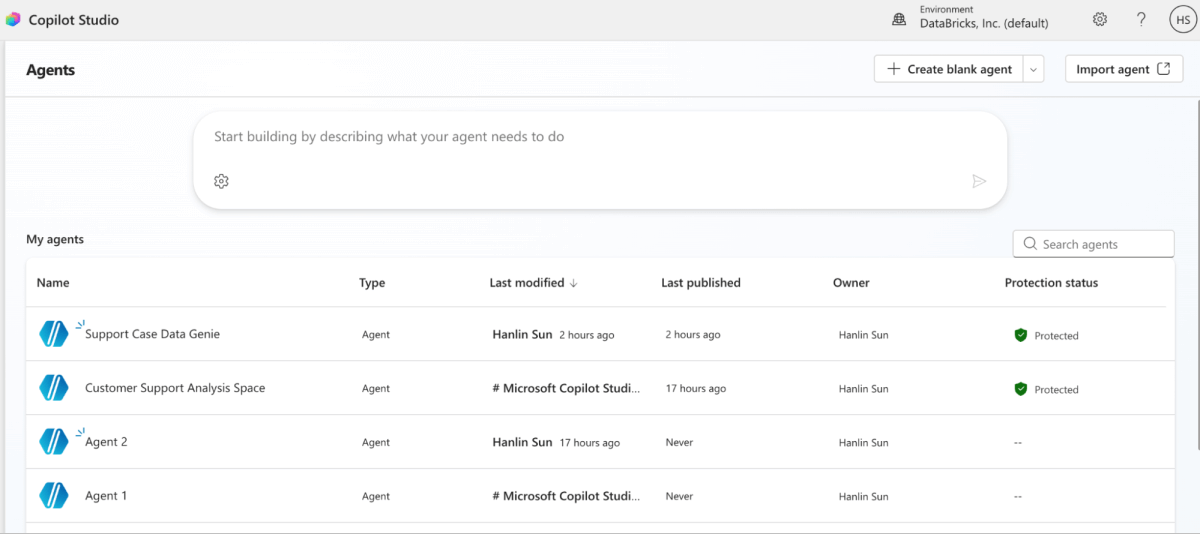
In Copilot Studio, click Agents. Select “Create blank agent” to build a new standalone agent for a Genie space. If you want to bring Genie into an existing agent framework, you can also choose an existing Copilot Studio agent to add your Genie space to.
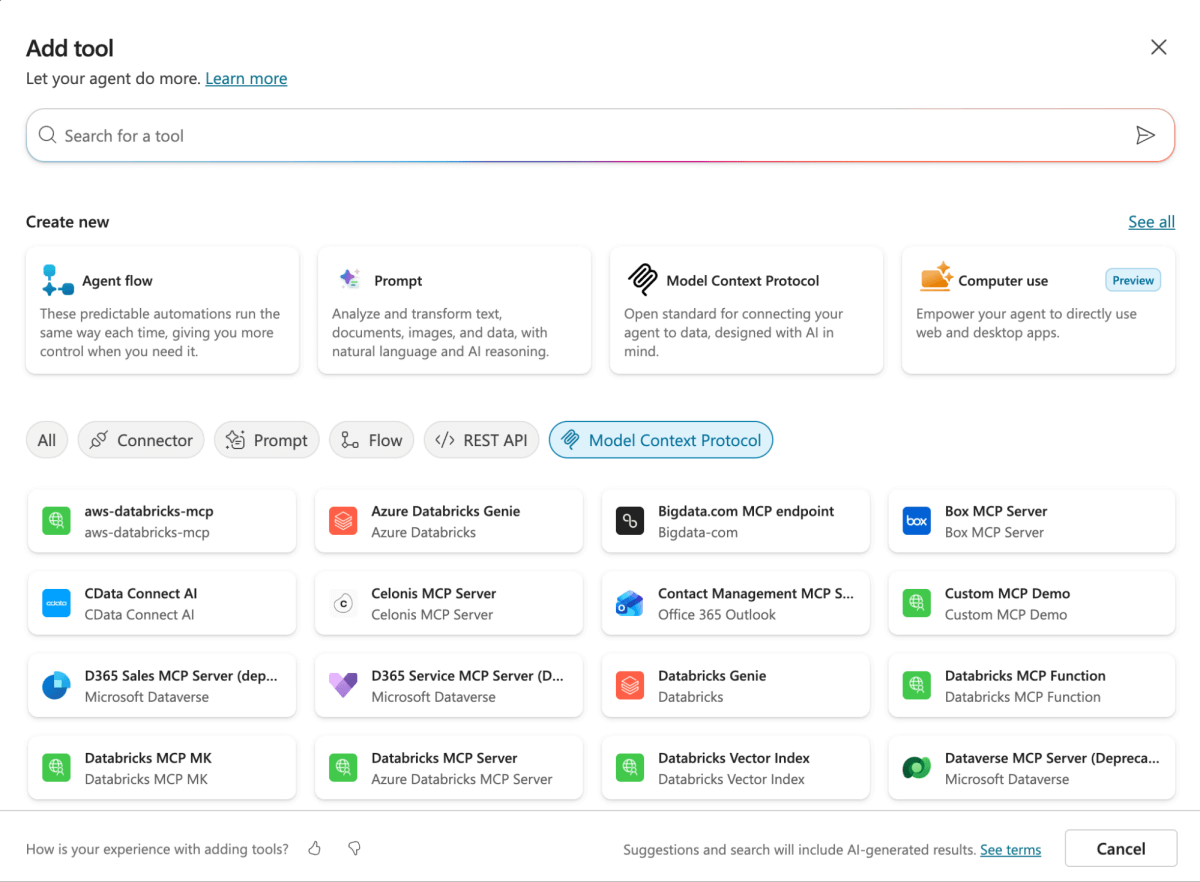
In your new agent, click ‘Tools’, click “Add a tool”. Select Azure Databricks Genie (or Databricks Genie for AWS/GCP) under the MCP section.
Now, you can select your desired Genie space and configure the connection details:
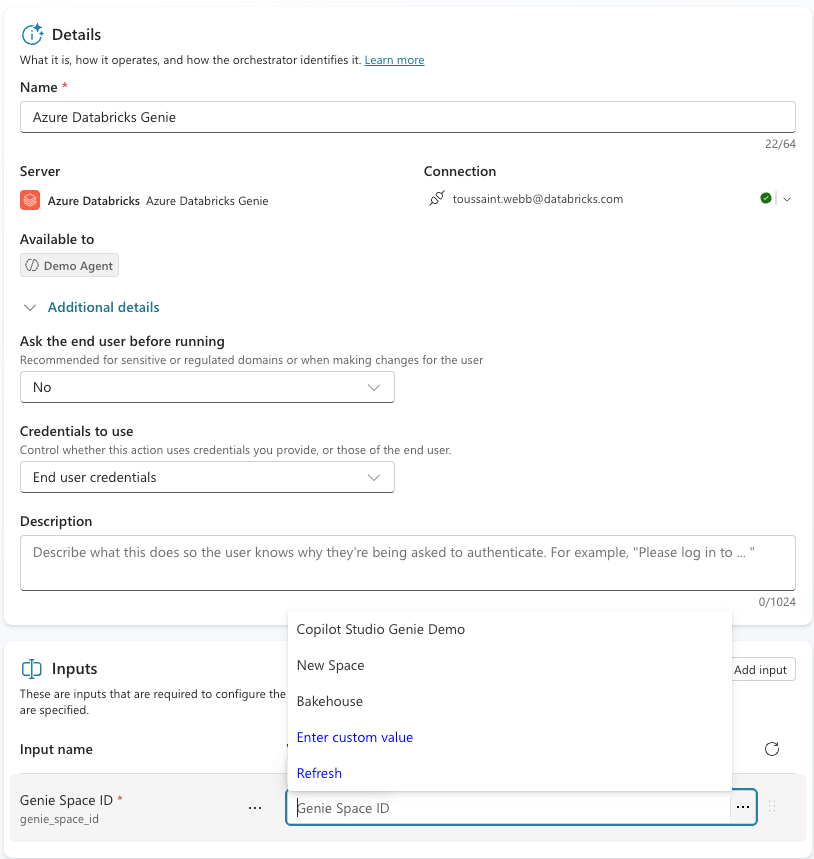
- Credentials to use: Select “End user credentials” to ensure that each application user will sign-in with their own identity and data access permissions. This ensures if an application user doesn’t have access to the Genie space or the tables, they won’t be able to retrieve data insights from Genie.
- Select “Maker provided credentials” if you want end-users to authenticate using a single shared identity (either a service principal—recommended—or your own identity).
- IMPORTANT: Ensure your target Genie space has a clear title and description that outlines its context, key concepts, and limitations. This will help your Copilot Studio agent effectively orchestrate requests.
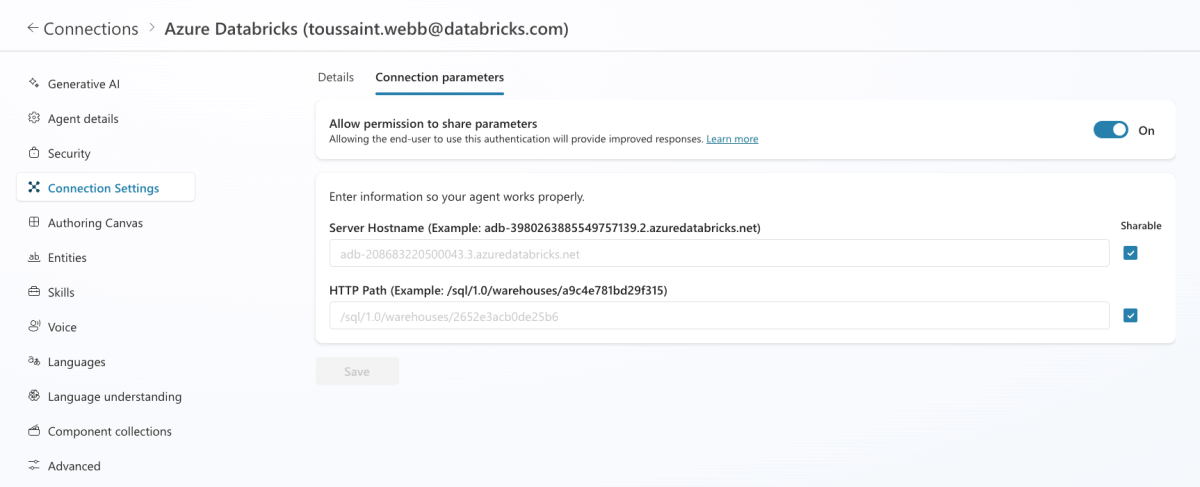
Step 3: Enable Connection Parameter Sharing
When you choose “End user credentials,” each person must sign into Databricks with their own account. To make this simpler, we suggest sharing Connection parameters (as described in the Microsoft documentation), so users don’t have to provide that information themselves. In practice, this simply means providing the server hostname and HTTP path, which ensures they authenticate to the exact Databricks workspace linked to the Genie space connected in your Copilot Studio agent.
- Open the Settings page of your Copilot Studio Agent.
- Open Connection Settings and ensure Azure Databricks shows a Connected status.
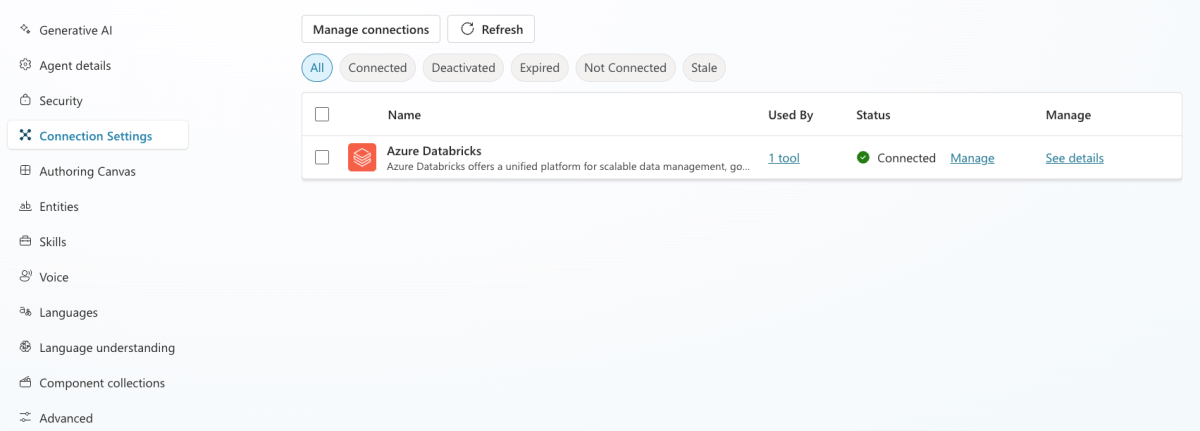
- Next click See Details, and allow permission to share parameters in the Connection parameters tab.
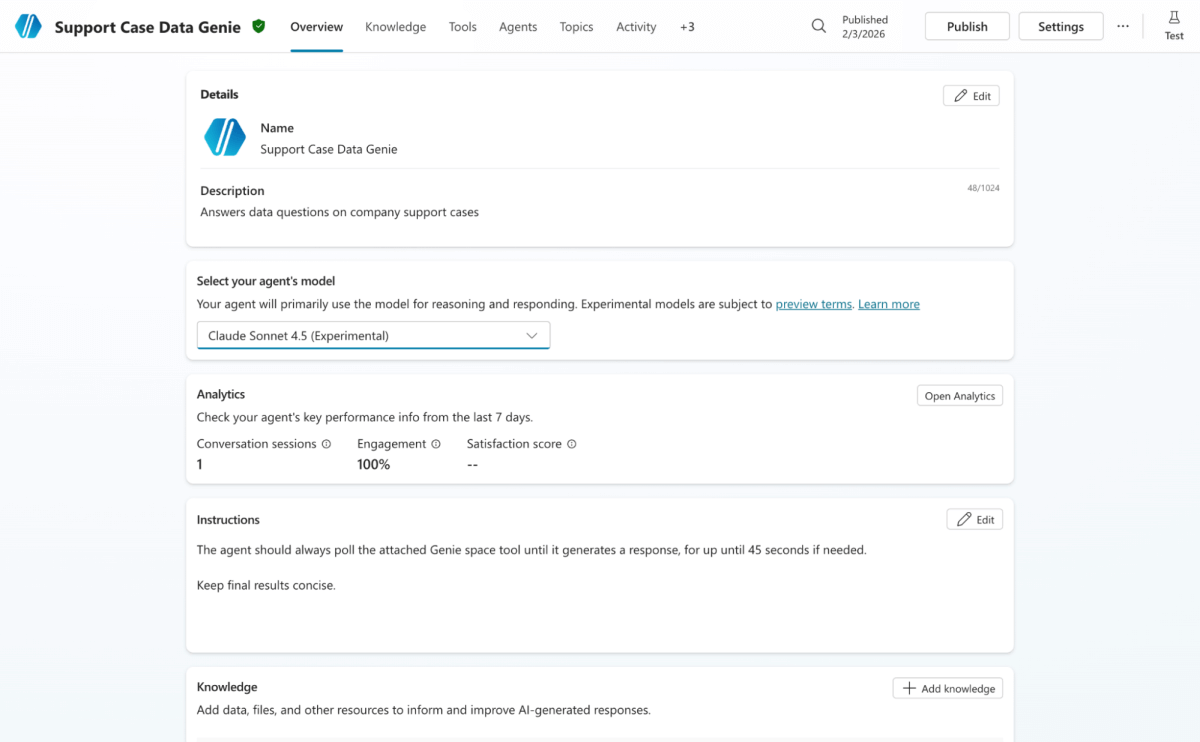
Step 4: Bring Your Agent into Teams
Now that you have a Copilot Studio Agent that is connected to your Genie space, you can publish it to Teams.
- Make sure your agent has a clear Name and Description.
- We also recommend:
- Selecting a reasoning model (e.g. GPT-5 Reasoning, Claude Sonnet 4.5) for effective polling and use of Genie.
- Adding custom agent instructions to tailor the experience (e.g. answer formatting and latency preferences).
- After reviewing your Copilot Studio agent, click Publish. Then in Channels, pick Teams as your desired channel.
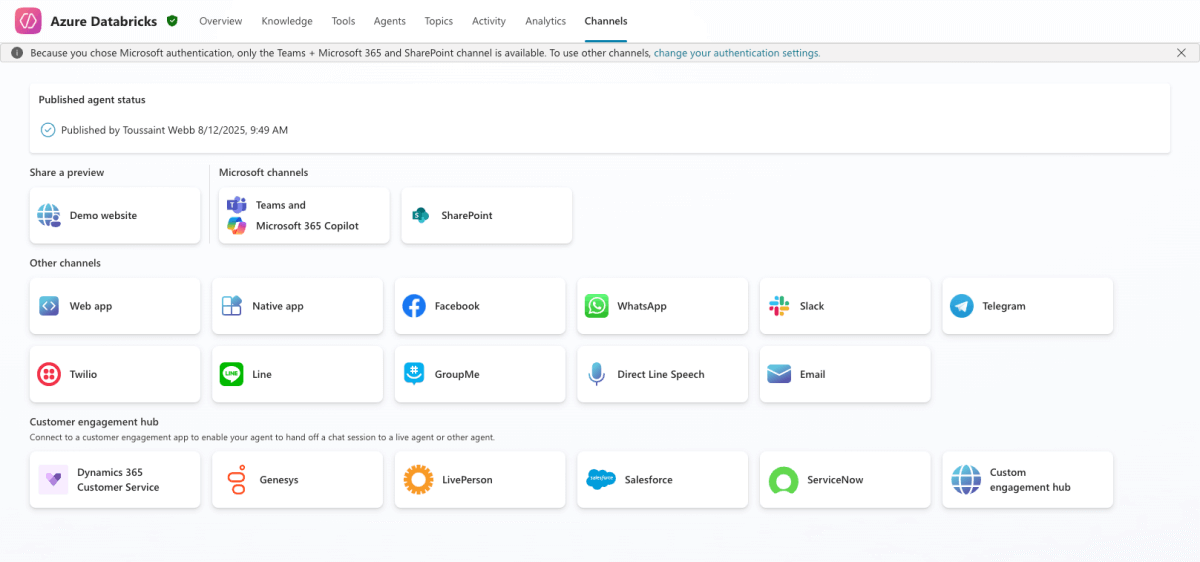
You’re all set! Genie is now live in Microsoft Teams, delivering governed data insights the instant questions come up.
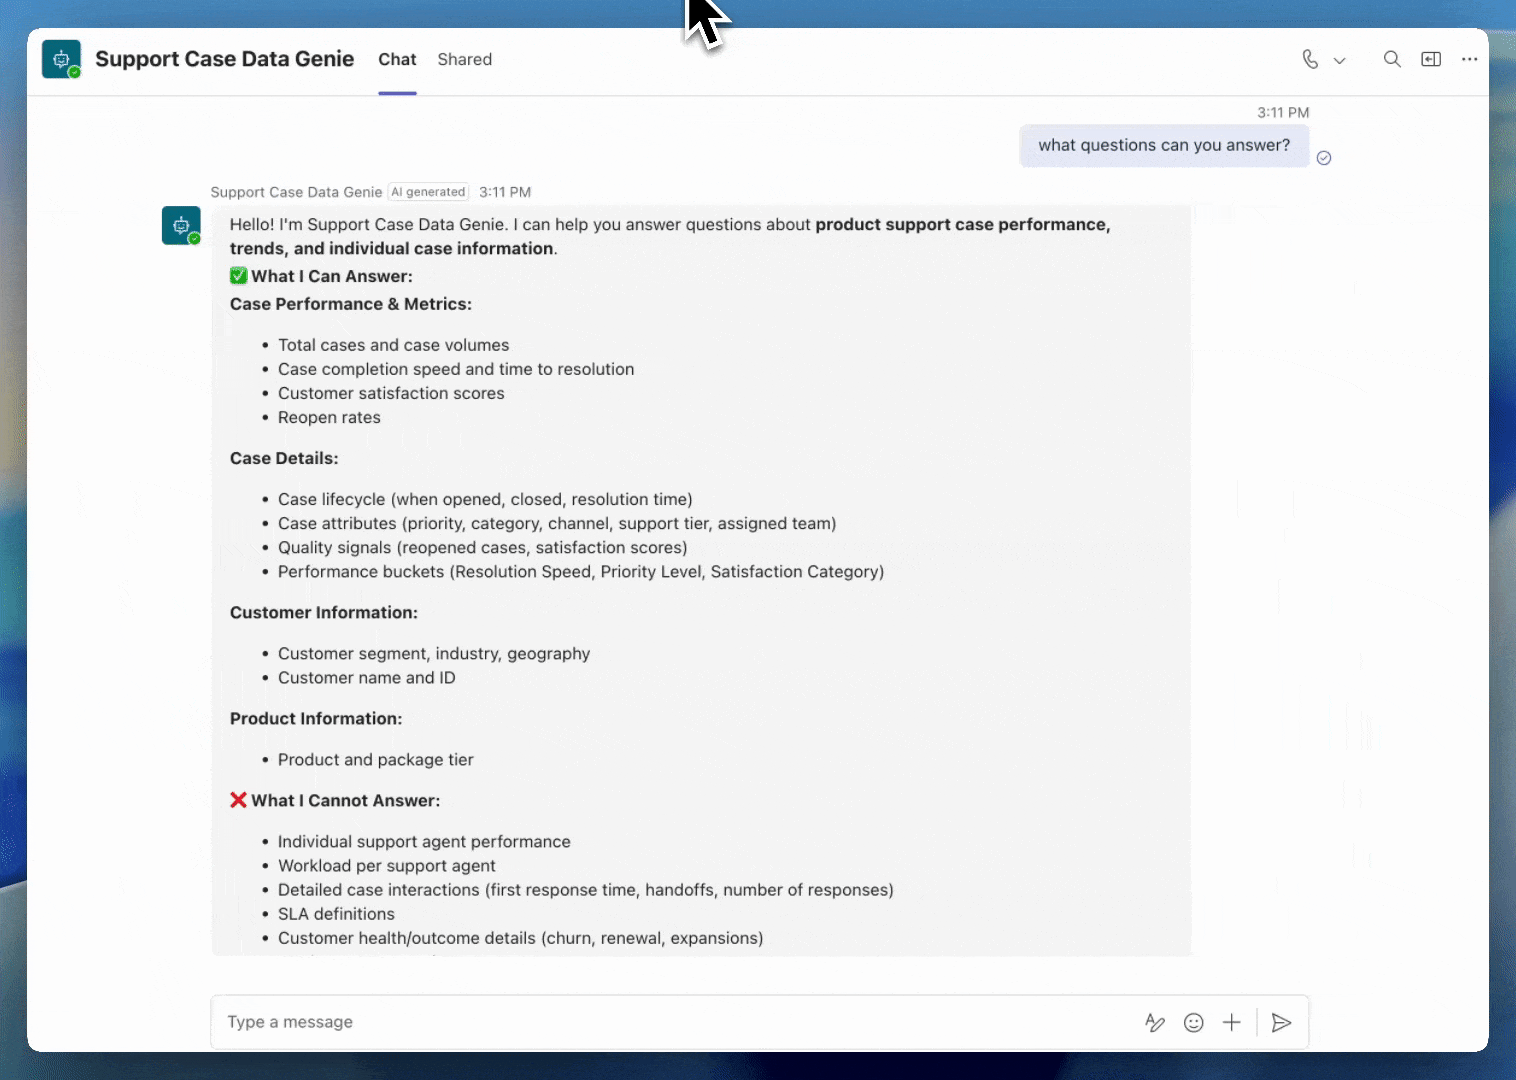
To see how end users are leveraging Genie in Microsoft Teams, see our customer stories.
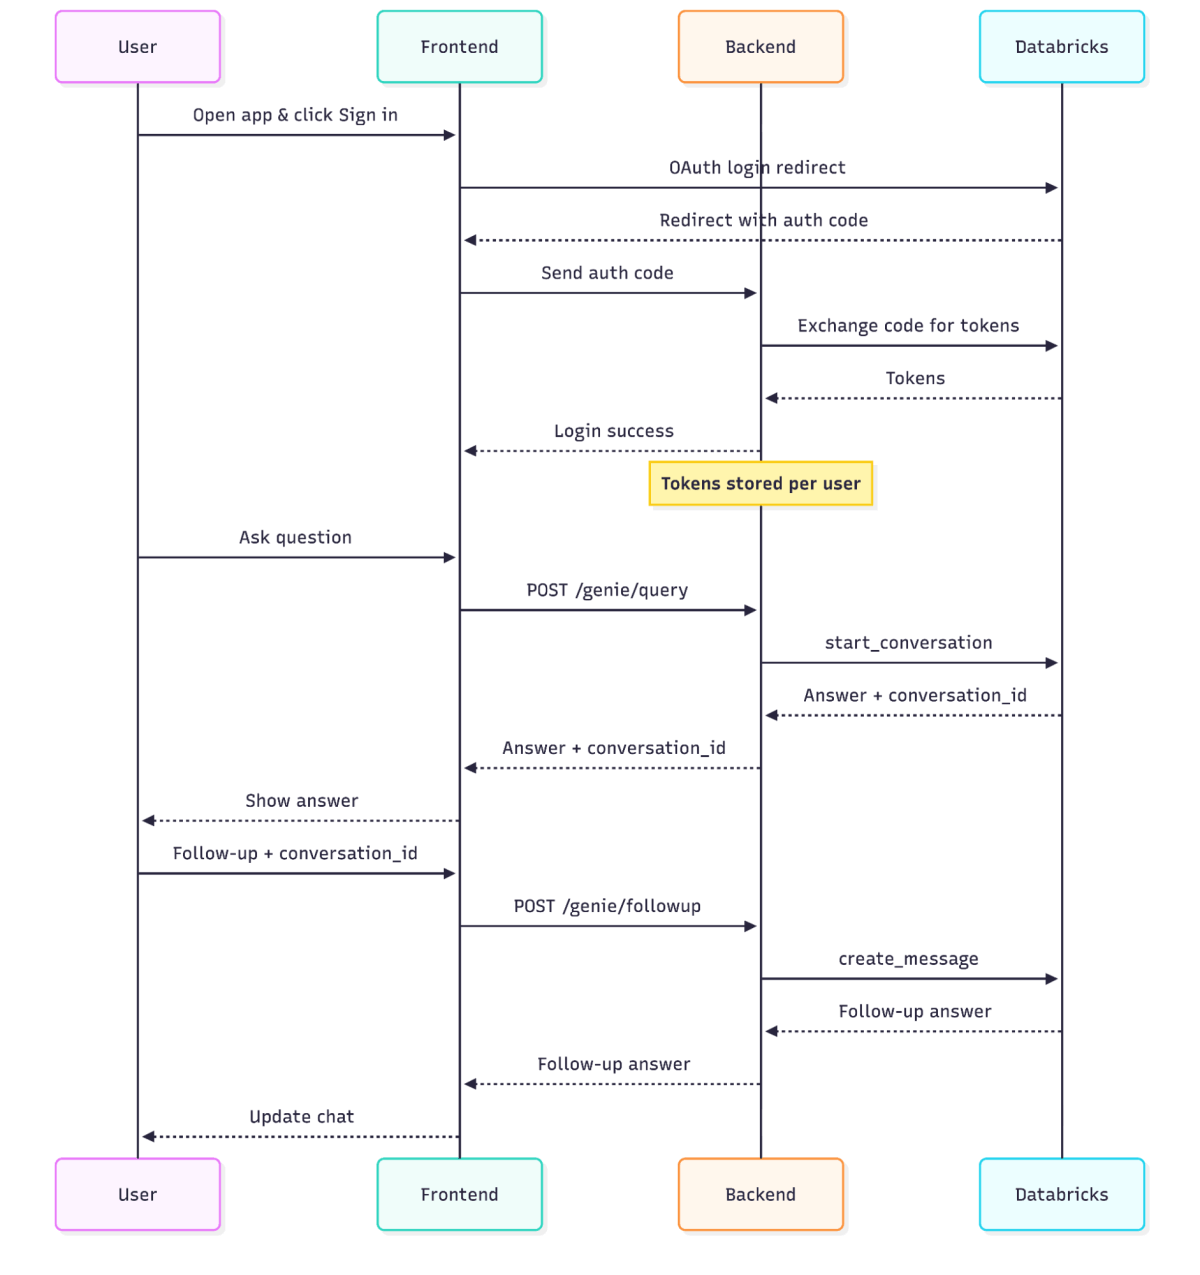
Bringing Genie to Custom Web Applications
Many organizations also want to embed Genie directly in their custom web apps, so users can ask questions in the tools they already use—for example, store managers could ask ad-hoc questions about their inventory directly in their existing sales terminal. With Genie Conversation APIs and Databricks OAuth, this is now possible.
Before building an integration between your web app and Genie, it’s important to decide what OAuth pattern you’ll use: User-to-Machine (U2M), Machine-to-Machine (M2M), or an On-Behalf-Of (OBO) model. Each approach aligns with a different type of application use case:
- User-to-Machine (U2M) - Best when each end user needs governed, personalized data access. In this model, a user signs in with their corporate identity (e.g. SSO), Genie receives a user-specific OAuth token, and queries are run with that user’s permissions. Example use case: a Sales Copilot where sales reps chat with a single underlying Genie space and should only see data insights from their own deals.
- Machine-to-Machine (M2M) - Best for use cases that want all users to have the same data access and simpler governance. This model lets a service principal authenticate and issue an associated OAuth token to Genie, which is then used to run queries under the service principal’s permissions. Example use case: a “Company KPIs” chatbot where any employee can ask about company-wide KPI metrics and receive the same shared insights.
- On-Behalf-Of (OBO) - Best for apps that need per-user data governance but behind a central backend. In this model, your application would first authenticate into Databricks and then call Genie APIs “on-behalf-of” the end user with their data permissions applied. Example use case: a finance analytics portal where users chat to a unified chatbot that leverages Genie, and each user only sees the data they’re authorized for.
For the rest of this blog, we’ll focus on the first pattern for integrating with Genie: the OAuth U2M flow using Databricks’ built-in OAuth support.
NOTE: Databricks also supports OAuth token federation, which you can use to bring in tokens issued by your own identity provider and combine them with any of the methods described above for Genie access.
Pre-requisites
- Ensure that you have a target Genie space that is curated according to our best practices to deliver the highest quality.
- End users/service principals must have access to the target Genie space (at least CAN VIEW), SELECT privileges on the space’s Unity Catalog data, and CAN USE permission on the space’s SQL compute. End users can optionally be assigned the Consumer Access entitlement for streamlined “read-only” experience.
Step 1: Register an OAuth application
To securely connect your custom web app to Genie, start by registering it in your Databricks account. This step allows Databricks to securely issue user-scoped tokens for your app in later steps. Check out the product documentation to learn more.
In the Databricks Account Console, add a new OAuth connection and configure the following:
- Application Name: a human-readable name shown to users during sign-in
- Redirect URLs: one or more URLs where Databricks is allowed to send users after authentication. These must exactly match the URLs your app will use in later steps.
- Access scopes: grant access to All APIs so your app can call the Genie Conversation APIs on behalf of users.
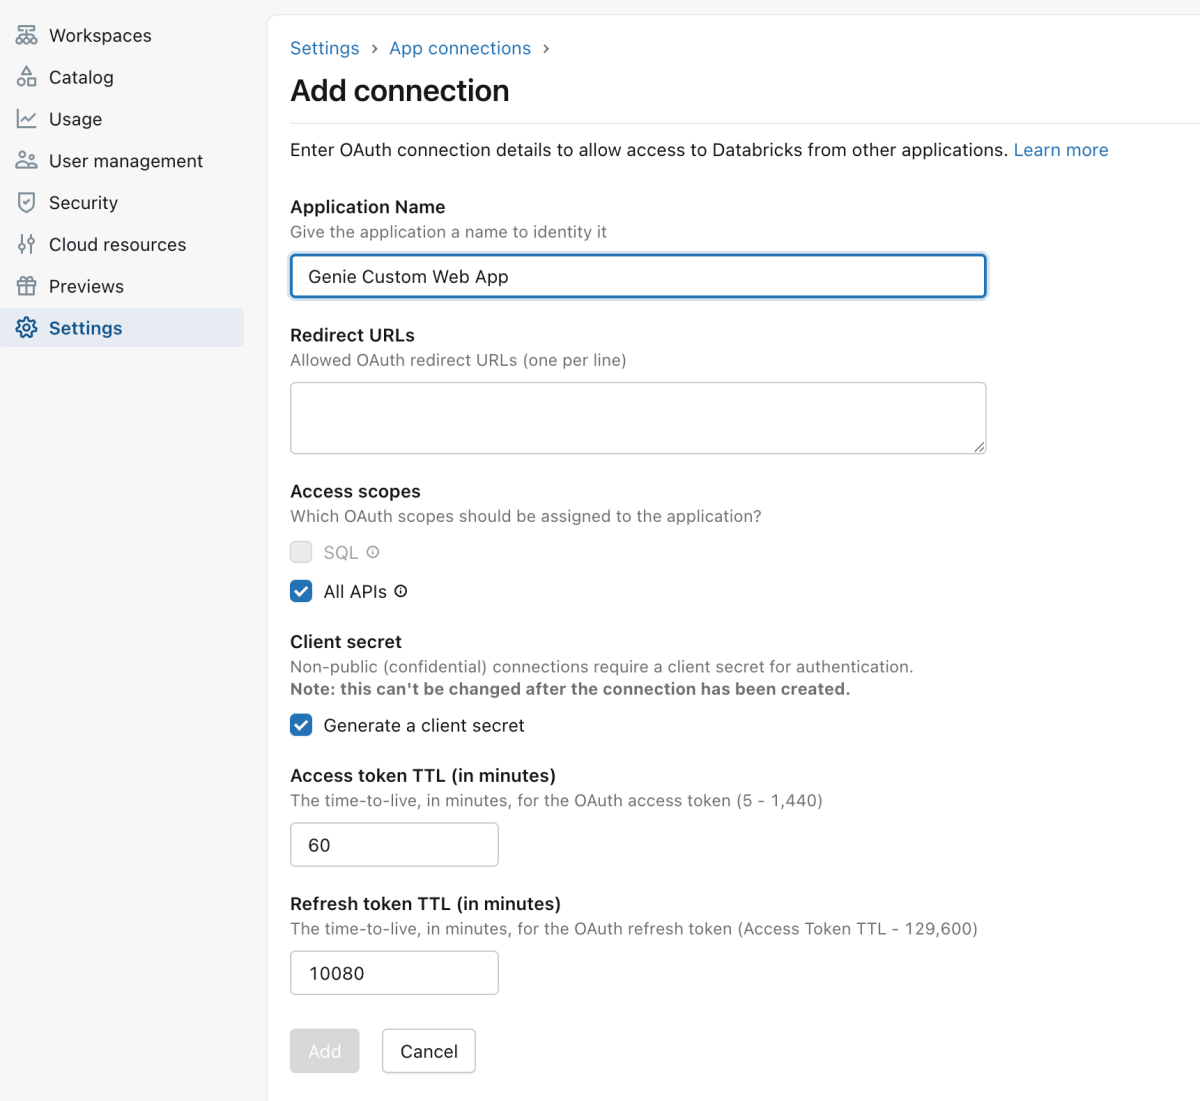
After saving this connection, Databricks will generate the following:
- Client ID: public identifier for your app
- Client Secret: private credential for your backend
Store these credentials securely in your backend—they will be required to exchange authorization codes for access tokens and authenticate calls to the Genie Conversation APIs.
Step 2: Direct users to Databricks to authenticate and grant access
The next step is to make sure your app directs end users to Databricks so they can sign in and approve your app to talk to Genie on their behalf. After a successful login and approval, Databricks will redirect the user to your app with a short lived authorization code.
This authorization code is proof that the user successfully authenticated into Databricks, and the user has approved your app’s requested access. Your app’s backend will use this authorization code in the next step to obtain access tokens.
To start, generate PKCE and state values for each sign-in to protect your web application:
- Generate a code_verifier and a matching code_challenge according to the OAuth PKCE standard using SHA-256 and Base64 URL encoding. This step prevents authorization codes from being stolen and reused (see code examples in documentation).
- Create a random state string and make sure to store it in a cookie or session. This ensures that authorization codes are generated for real end user sessions.
Next, your frontend should construct an authorization URL using the Databricks OAuth endpoint:
Include the following form parameters to identify your application for your users:
- <databricks-instance>: Your Databricks instance with the workspace instance name (e.g. dbc-a1b2345c-d6e7.cloud.databricks.com)
- <client_id>: the client ID from your registered OAuth application in the previous step
- <redirect-url>: the same redirect URL as specified in the previous step
- <state>: - Any plain-text string to validate the response
- <code-challenge>: PKCE code challenge derived from the code_verifier
After a user signs into their Databricks account, they will be redirected to the redirect_url with query parameters: https://<redirect_url>/oauth/callback?code=<authorization_code>&state=<state>
Your callback handler should read the authorization_code and state from the query string. Verify the state value matches what was stored in cookies or web sessions. If it doesn’t discard the authorization_code. With the returned authorization_code, your application can now exchange them for access tokens.
Step 3: Exchange authorization codes for tokens and manage them securely
The authorization code retrieved in the previous step cannot be used to call APIs directly—it must be exchanged for access tokens on your backend that are needed to securely talk to Genie. For more information please refer to our product documentation).
Below is a Python example for exchanging authorization codes for access and refresh tokens (see details in OAuth SDK documentation):
Include the following parameters:
- <databricks-instance>: your Databricks instance with the workspace instance name
- <client_id>: the client ID from your registered OAuth application in the previous step
- <client_secret>: the client secret for your app generated from Step 1
- <redirect-url>: the same redirect URL as specified in Step 1
- <code-verifier>: the verifier generated in Step 2
It’s important to save the following values from the result object to your app’s database:
- access_token: used to call Genie Conversation APIs
- refresh_token: used to obtain new access tokens without forcing the user to re-login
- expires_in: an expiration time for the access token
- expires_at: a timestamp for when the access token is no longer valid
To securely manage access tokens, it’s also important that your app tracks expiration times and uses the refresh tokens to obtain new access tokens when needed. The code example below abstracts refresh logic away to always return a valid user access token:
Step 4: Route User Prompts to Genie Conversation APIs
Now that your application has user-scoped Databricks access tokens, it can submit prompts to a Genie space on behalf of the signed-in user. We recommend creating a backend API router for your web application to protect the Databricks access tokens from the browser and to centralize observability, error handling, and rate limiting. The code examples below leverage FastAPI and Genie’s SDK for simpler logic.
- First, use the user’s access token to create a scoped WorkspaceClient. This WorkspaceClient will then be able to call the Genie SDK. Code example:
- Next, expose application-owned HTTP endpoints that translate into Genie SDK calls in the backend. This ensures that all Genie SDK calls are done within your server and access tokens are never sent to the browser.
- For example, this is how to build an HTTP endpoint for starting a new Genie conversation:
- Continue adding additional API routers for the Genie actions that you want your app to support. The essential functions to include are:
- Send follow-up message - for follow up messages to an existing conversation
- create_message_and_wait(space_id: str, conversation_id: str, content: str, timeout: datetime.timedelta = 0:20:00) → GenieMessage
- Retrieve query results - retrieves SQL results if the message has a query attachment
- get_message_attachment_query_result(space_id: str, conversation_id: str, message_id: str, attachment_id: str) → GenieGetMessageQueryResultResponse
- Get message - retrieve statuses and results for a specific message
- get_message(space_id: str, conversation_id: str, message_id: str) → GenieMessage
- List messages in a conversation - to list all previous messages in a conversation
- list_conversation_messages(space_id: str, conversation_id: str [, page_size: Optional[int], page_token: Optional[str]]) → GenieListConversationMessagesResponse
- See Genie SDK documentation for all available functions.
- Send follow-up message - for follow up messages to an existing conversation
After these steps, your custom web app will be securely integrated with Genie, letting users ask natural-language questions and retrieve governed insights directly in the tools they already use.
Access Genie Everywhere
Genie is designed to meet users wherever they work. In this blog, we covered how organizations securely embed Genie’s conversational analytics capabilities into Microsoft Teams and custom apps with OAuth authentication.
By bringing Genie everywhere your teams ask questions, you shorten the path from question to insight—and from insight to action. Start building Genie spaces and bringing them to your users today. As always, reach out to your Databricks account teams for questions and feedback.
Get the latest posts in your inbox
Subscribe to our blog and get the latest posts delivered to your inbox.