5 Steps to Get Started With Databricks on Google Cloud
by Hiral Jasani and Dhruv Kumar
Since we launched Databricks on Google Cloud earlier this year, we’ve been thrilled to see stories about the value this joint solution has brought to data teams across the globe. One of our favorite quotes is from Douglas Mettenburg, Vice President Analytics at J. B. Hunt: “Ultimately, Databricks on Google Cloud is now the source of truth for J.B. Hunt. It’s showing the real value of the data we bring to the entire company, as we create more AI solutions that greatly impact our business.”
As Douglas describes it, Databricks on Google Cloud is designed to store all data on a simple, open lakehouse platform that unifies all analytics and AI workloads. It boosts data-driven decision making within organizations by enabling better collaboration across data engineering, data science and analytics teams with a cloud-based lakehouse architecture. And to make it even easier to access, the solution is available within the Google Cloud console along with the rest of its infrastructure.
Taking the first steps with Databricks on Google Cloud is easy, just follow the onboarding guide below that outlines the step-by-step instructions. You can also see these steps in action in the demo video.
1. Subscribe to Databricks from GCP Marketplace
Start by logging into the Google Cloud Platform. If you are a new user, you need to create an account before you subscribe to Databricks. Once in the console, start by selecting an existing Google Cloud project, or create a new project, and confirm your Google Cloud Identity organization object defined within your Google Cloud Console. This step requires permissions from your billing administrator to set up a Google billing account or select an existing account that you may use for Databricks. This can be done using Billing in the left navigation bar in the GCP console.
Find Databricks under Partner Solutions in the GCP console or simply search in the Marketplace. You are now ready to subscribe.
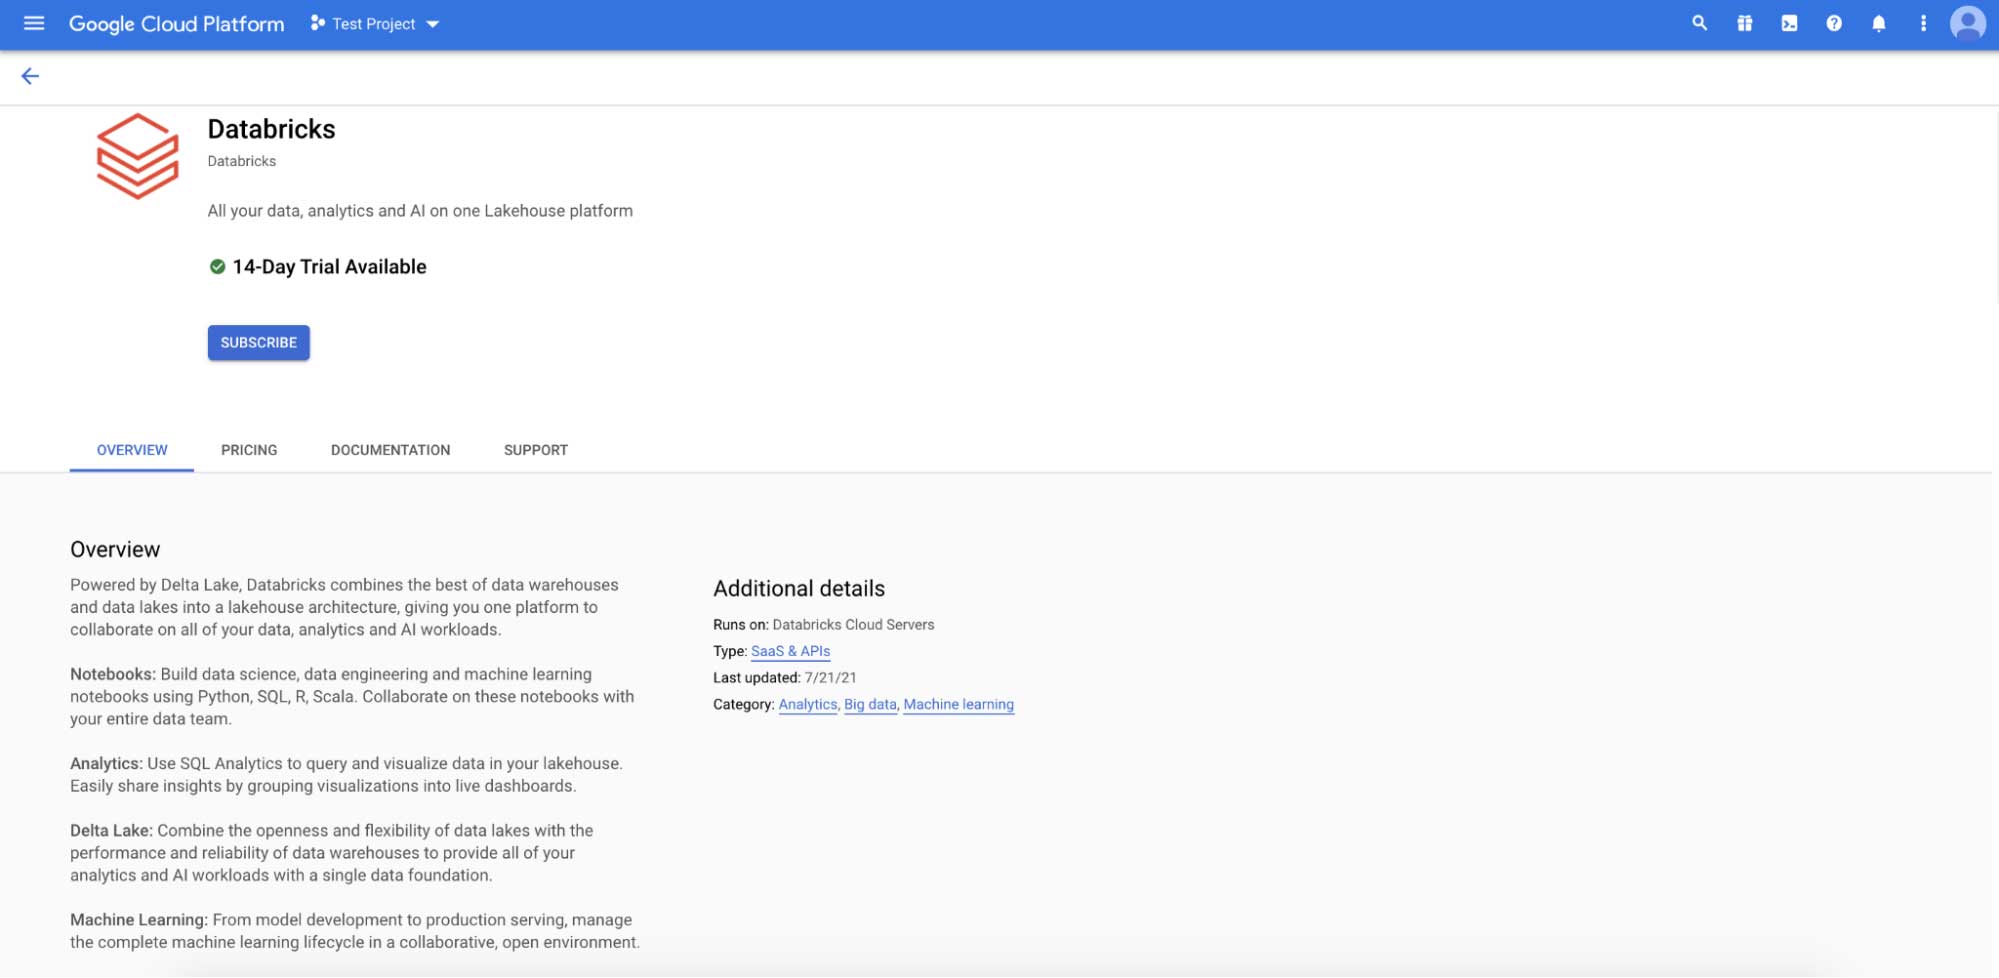
Once you confirm the terms, you can sign in using the familiar blue Google SSO. A tight integration with Google IAM allows you to simply authenticate Databricks workspace users with your Google Cloud Identity account via Google’s OAuth 2.0 implementation. This means Databricks does not have access to your login info, eliminating the risk associated with storing or protecting your credentials in Databricks.
2. Prerequisites for Databricks setup in GCP
You are almost ready to create your first Databricks workspace, but first review the prerequisites below.
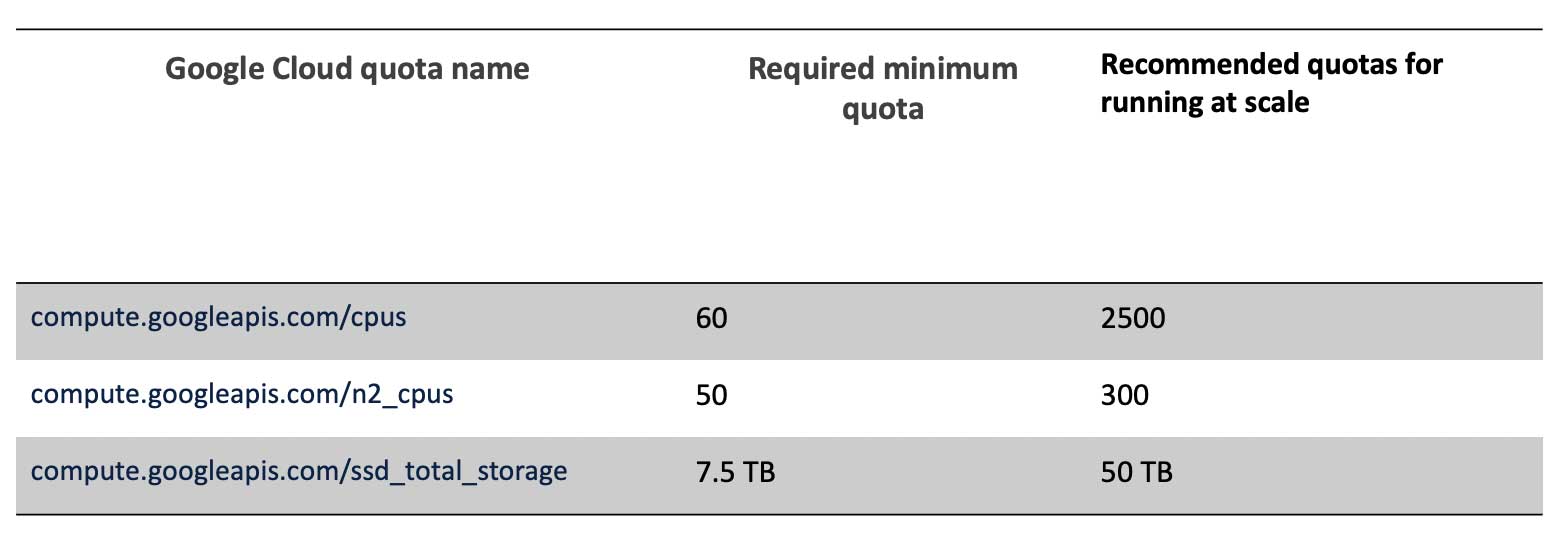
Ensure adequate resource quotas
You will need to allocate the minimum quotas for the target Google Cloud regions where your Databricks clusters will run. We recommend you verify the entire list of quotas in the user documentation in case your project’s quotas are less than the GCP default.
Size your network
Next, configure the GKE subnets used by your Databricks workspace. You only get to do it once before creating the first workspace and is important because your workspace needs sufficient IP space to successfully run Databricks jobs. For convenience, Databricks provides a calculator that helps you determine if the default IP ranges for your subnets meet your needs.
Review session length constraints
If your IT administrator has set a global constraint on the session length for logged in users, Databricks will not be able to function correctly. In that case, please ask your administrator to add Databricks to the Trusted Apps list in the Google Workspace. See more details here.
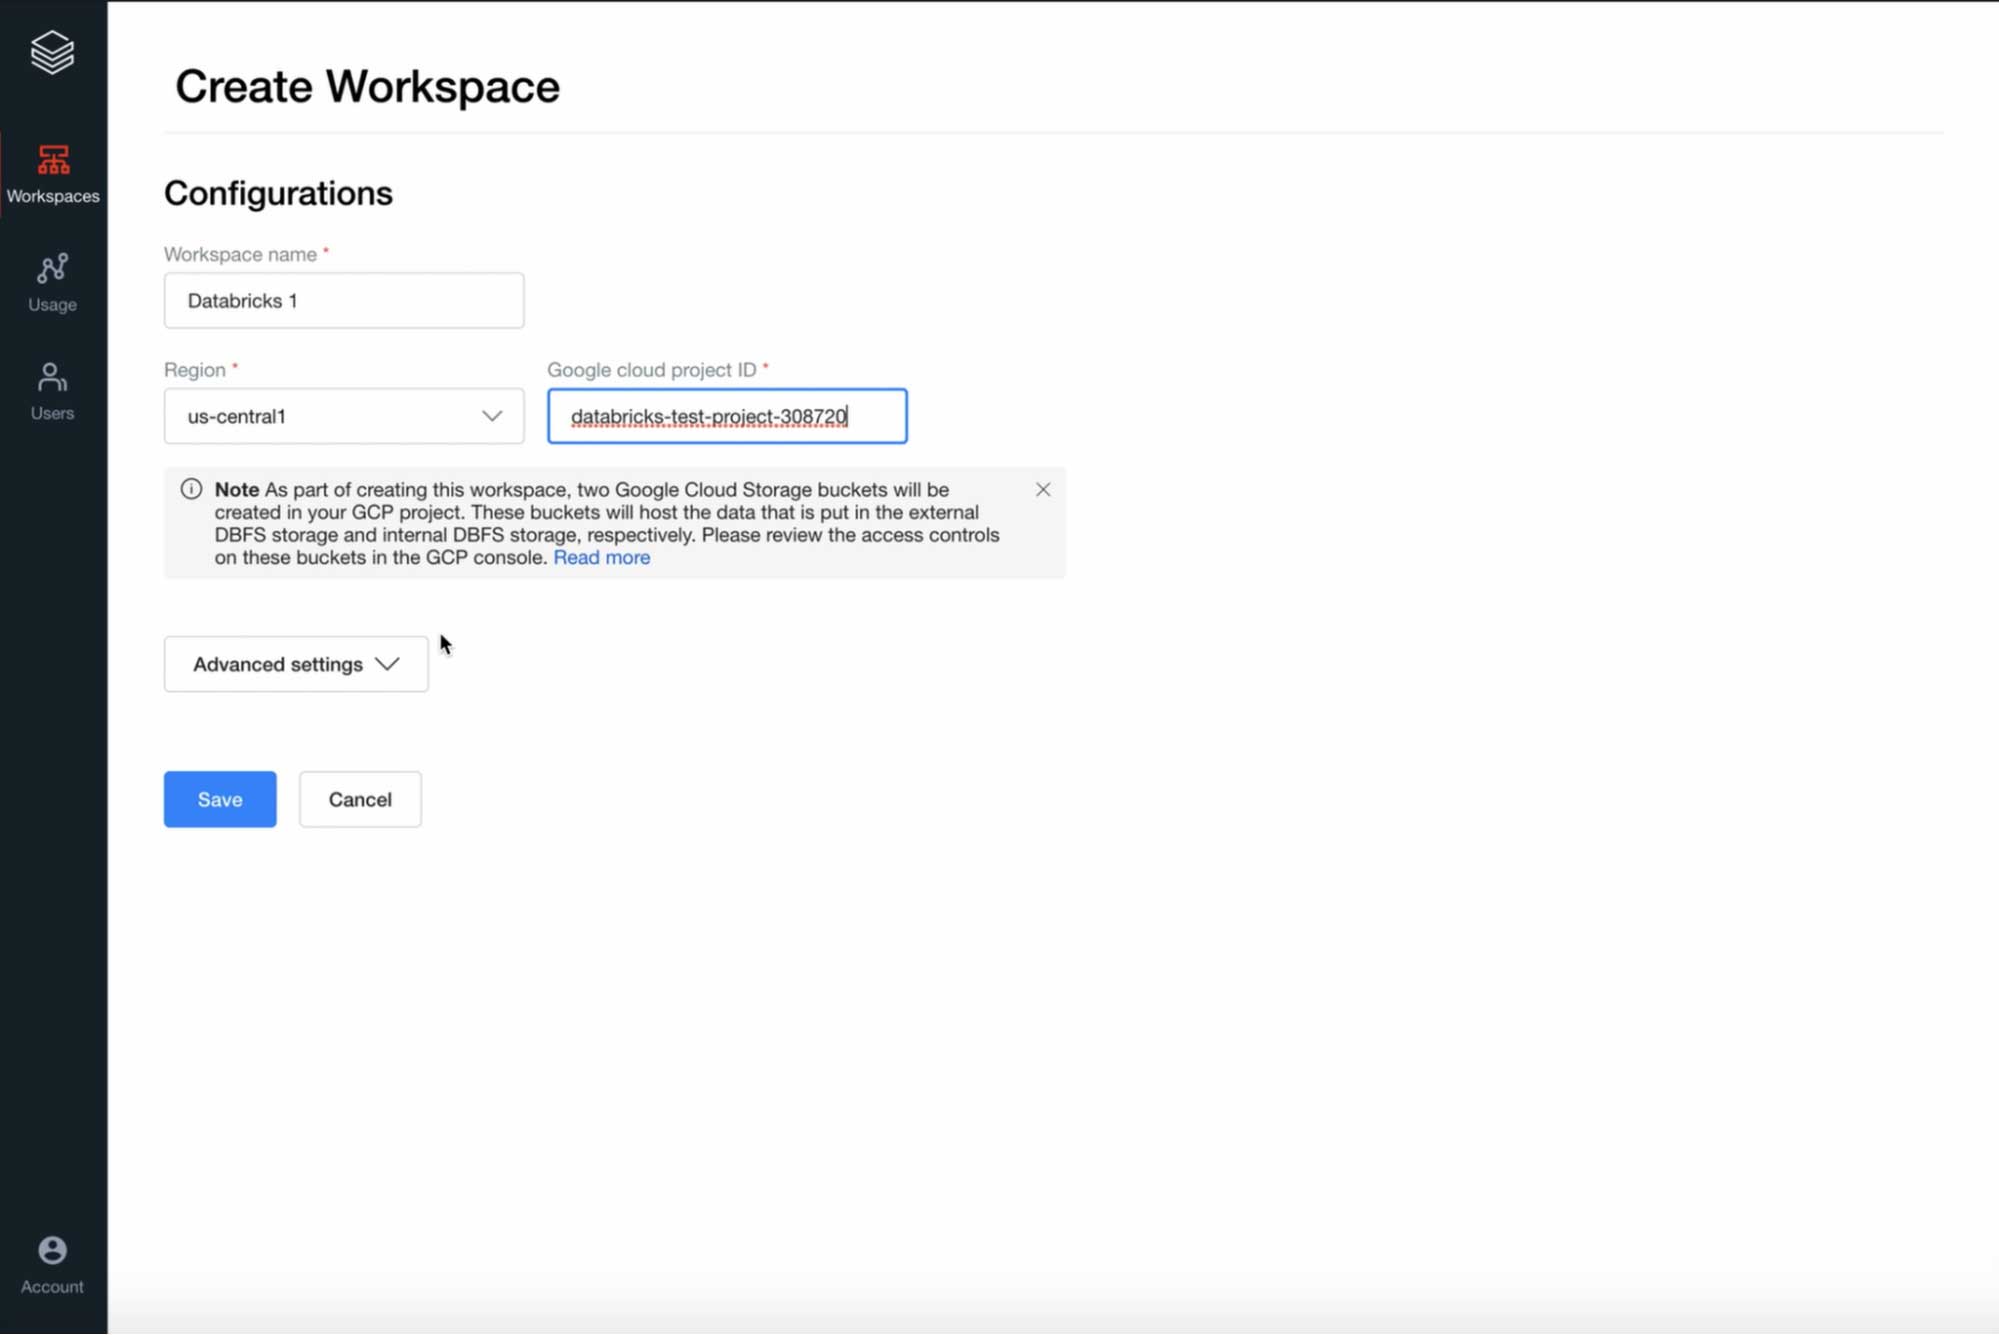
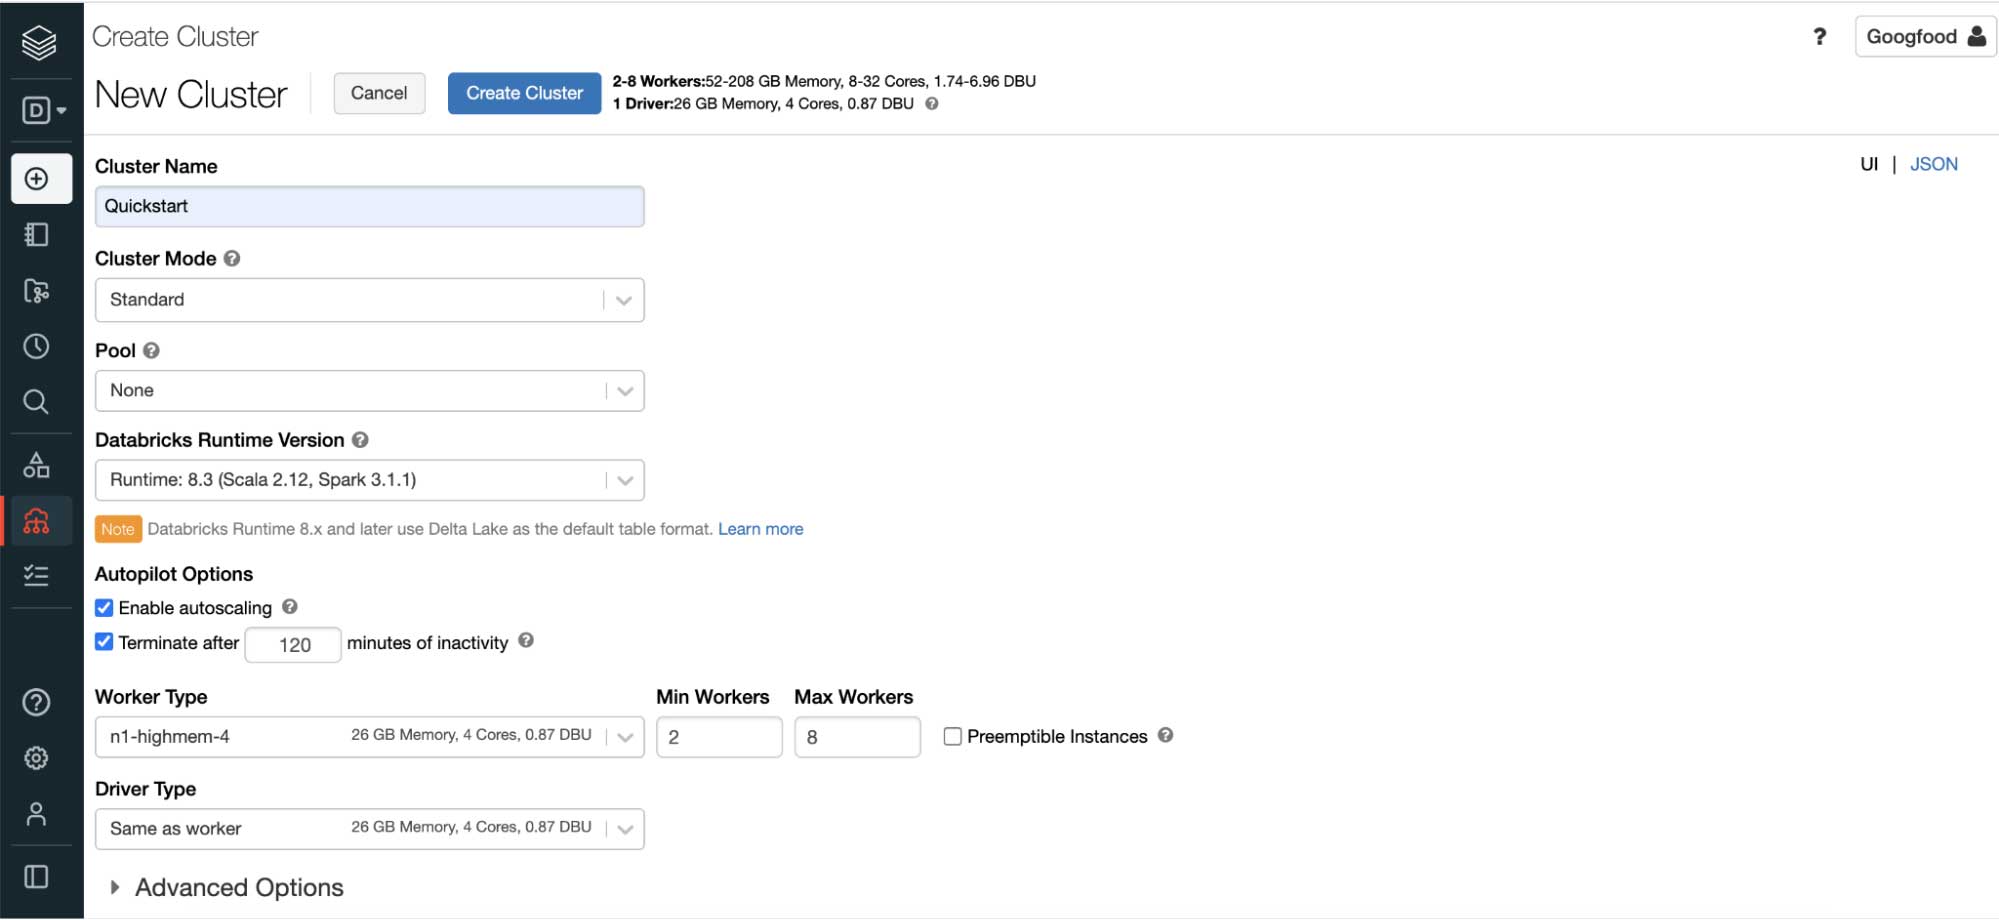
3. Create your first workspace
Now you are ready to create the Databricks Workspace. Once you have configured the prerequisites, create your first workspace on the Databricks account console with a name, region, and Google Cloud Project ID.
4. Add users to your workspace
Your Databricks admin can manage user accounts in the admin console. As admins, they can:
- invite more users or delete them.
- assign other users as admins to allow cluster creation permission.
Create groups for role-based access controls (RBAC) so different user groups may have different permissions. Again, the native IAM integration makes user authentication very simple.
5. Run your first Databricks job
Now the fun begins! Create a new cluster in your new Databricks workspace so that you have your compute engine instance to run your queries and jobs. When you create a new cluster for the first time, Databricks bootstraps a GKE cluster, which can take up to 20 minutes. Subsequent Databricks clusters will only take a few minutes.
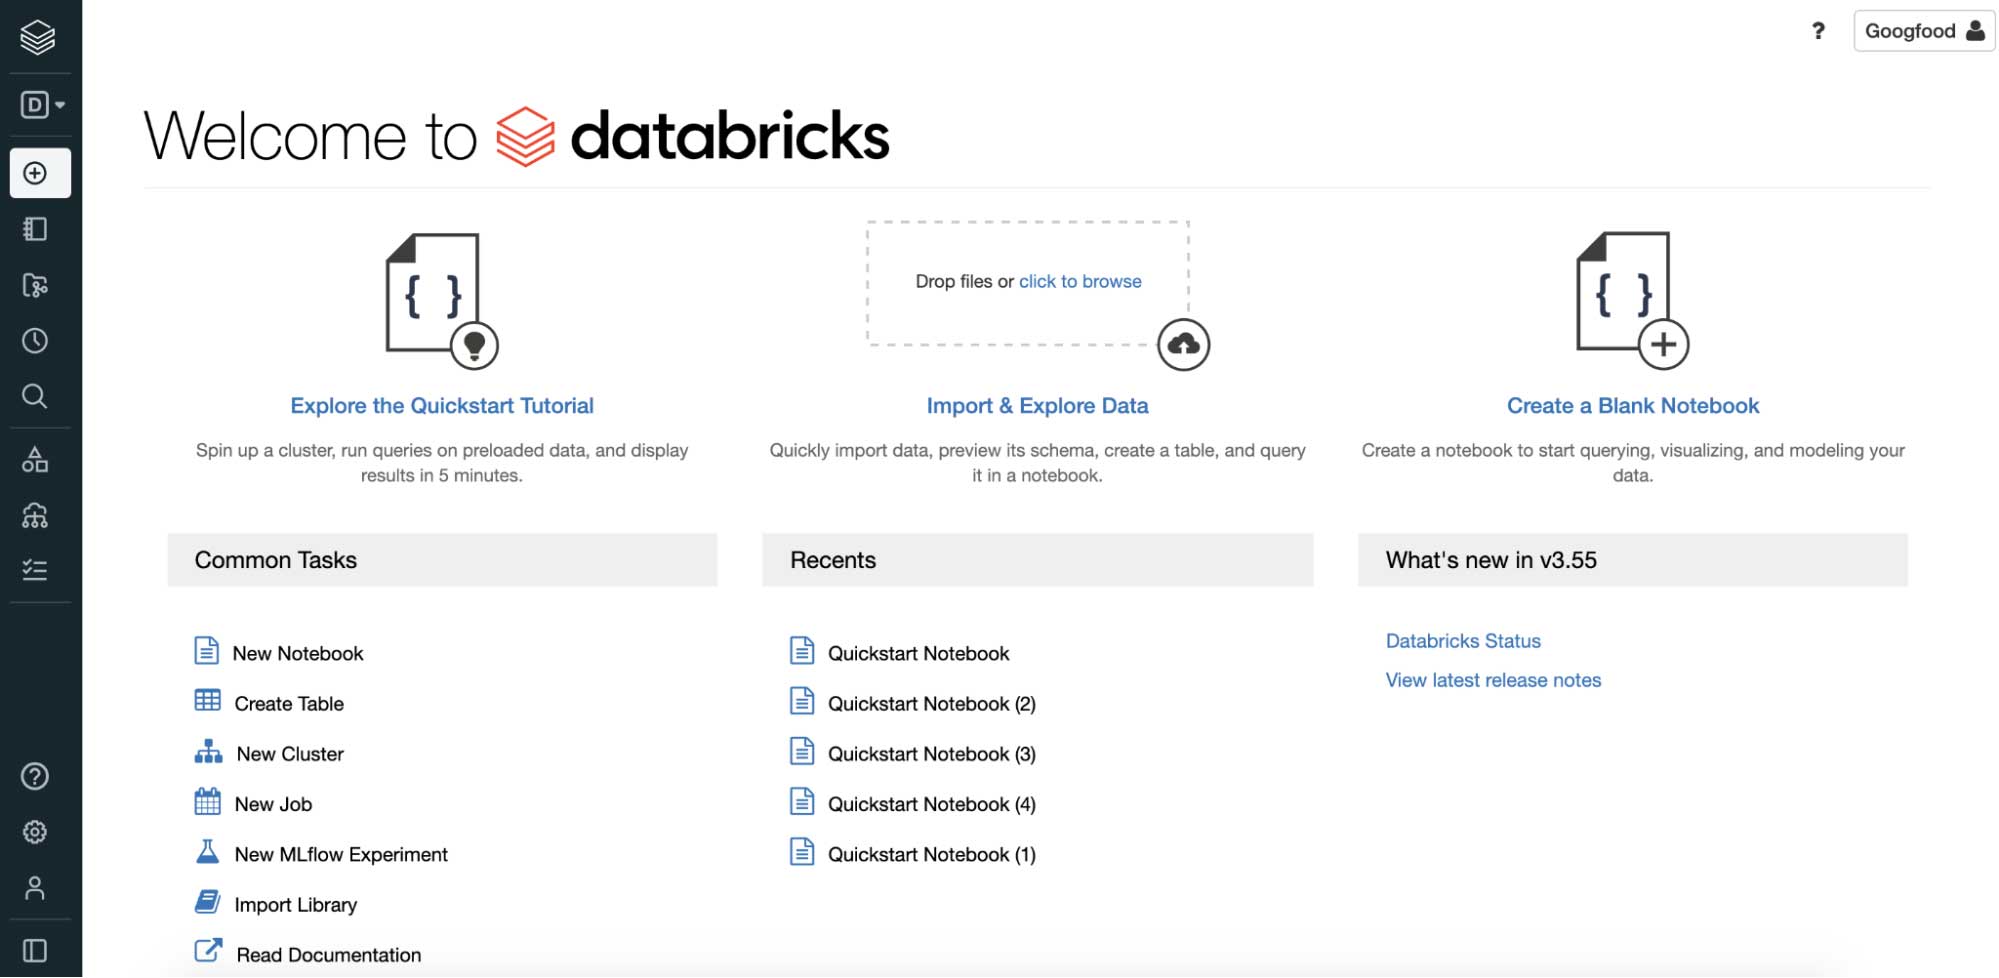
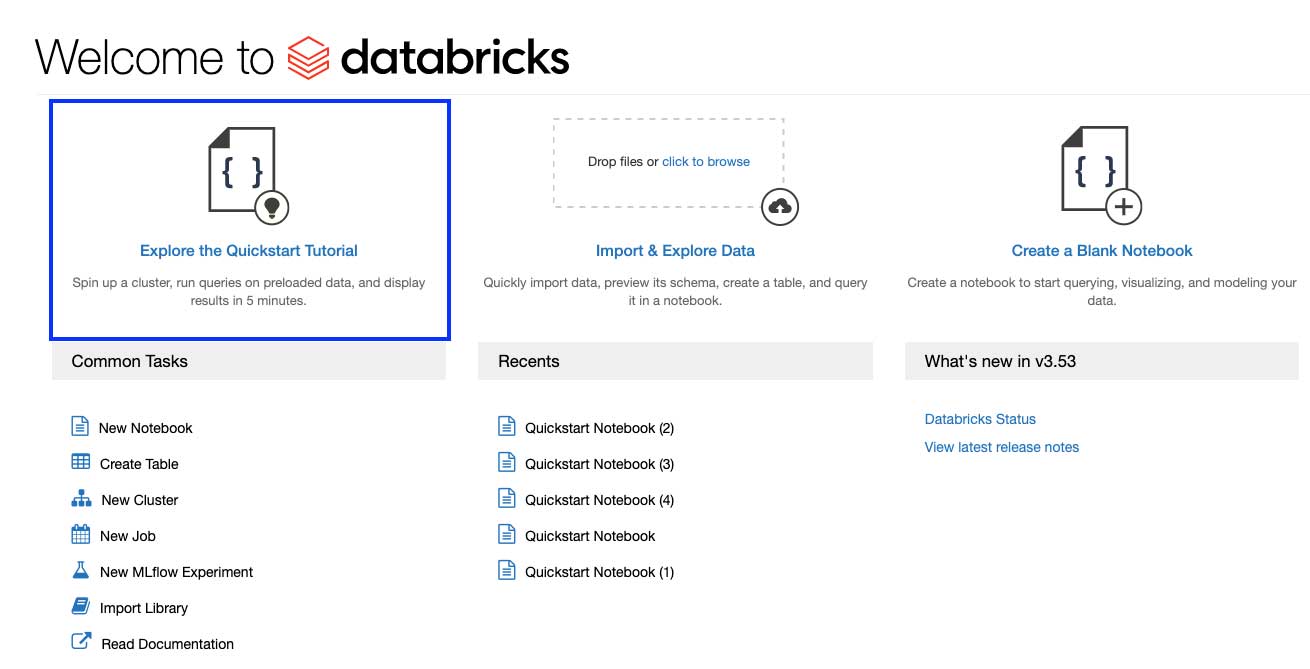
Let’s explore a quickstart tutorial notebook to see this all in action. A notebook is a collection of cells that run computations on a Databricks cluster. Once you attach a notebook to a cluster, you can start running your queries in any of the supported languages like Python, SQL, R and Scala and switch between them in the same notebook.
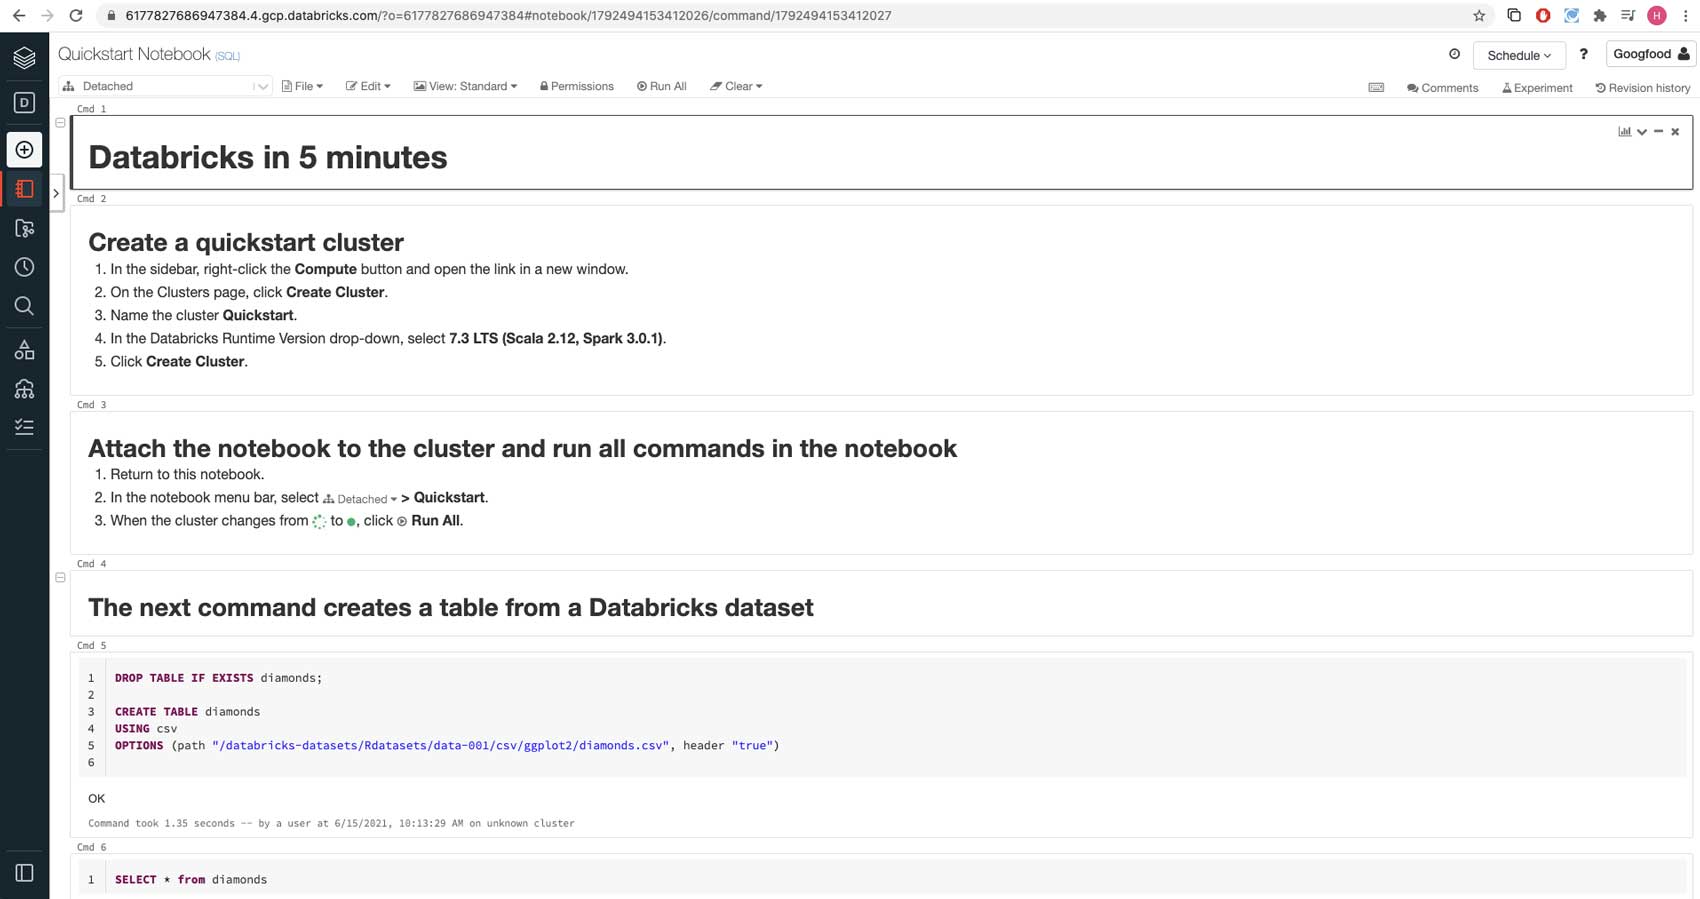
Here, we are creating a table using data from a sample CSV data file available in Databricks datasets, a collection of datasets mounted to Databricks File System (DBFS), a distributed file system installed on Databricks clusters.
Write the CSV data to Delta Lake format and create a Delta table. Delta Lake is an open table format that brings reliability, security and performance to your data lake. The Delta Lake format consists of Parquet files plus a transaction log, and we use Delta Lake to get the best performance on future operations on the table.
Next, read the CSV data into a DataFrame and write out in Delta Lake format. This command uses a Python language magic command, which allows you to interweave commands in languages other than the notebook default language (SQL).
Now you are ready to create a Delta table at the stored location and run a SQL statement to query the table for the average diamond price by color. You can click the bar chart icon to display a chart of the average diamond price by color.
That’s it! This is how you set up your Databricks on Google Cloud account and get started as a user by creating a workspace, cluster and notebook, then running SQL commands and displaying results.
Have questions?
Register for a live, instructor-led hands-on workshop to get answers to your questions and learn how to get started with Databricks on Google Cloud. There are multiple dates to choose from - sign up today!
Get the latest posts in your inbox
Subscribe to our blog and get the latest posts delivered to your inbox.