Data Exfiltration Protection with Databricks Lakehouse Platform on AWS
Learn how you could set up a secure Databricks architecture on AWS to protect against data exfiltration
While this guide contains valuable cloud-specific technical details, we now recommend our Unified Approach to Data Exfiltration Protection on Databricks which provides a comprehensive framework across AWS, Azure, and GCP with prioritized controls and implementation guidance.
The Databricks Lakehouse Platform provides a unified set of tools for building, deploying, sharing, and maintaining enterprise-grade data solutions at scale. Databricks integrates with cloud storage and security in your cloud account, and manages and deploys cloud infrastructure on your behalf.
The overarching goal of this article is to mitigate the following risks:
- Data access from a browser on the internet or an unauthorized network using the Databricks web application.
- Data access from a client on the internet or an unauthorized network using the Databricks API.
- Data access from a client on the internet or an unauthorized network using the Cloud Storage (S3).
- A compromised workload on the Databricks cluster writing data to an unauthorized storage resource on AWS or on the internet.
Protecting Data in Transit and at Rest with AWS Native Tools in Databricks
Databricks supports several AWS native tools and services that help protect data in transit and at rest.
Security Groups
Security Groups are stateful virtual firewalls attached to EC2 instances. They allow you to define which inbound and outbound traffic is permitted. Narrowing egress (outbound) rules restrict EC2 instances from sending data to unauthorized IP addresses or the public internet, effectively blocking unintended data leaks.
- Prevents: Unauthorized outbound connections from Databricks compute resources.
VPC Endpoint Policies
VPC endpoint policies control access to AWS services through VPC endpoints. By allowing only required operations on specific AWS resources (like S3 buckets), you can prevent Databricks workspaces from exfiltrating data to other AWS accounts or services.
- Prevents: Databricks from sending data to unauthorized AWS services or resources.
VPC Endpoints
VPC Endpoints establish private connections between your VPC and other AWS services without traversing the public internet. This ensures that sensitive data is never exposed to external networks, mitigating data exfiltration risks via internet routes.
- Prevents: Exposure of traffic to the public internet during service communication.
- Documentation: AWS VPC Endpoints
IAM Roles
IAM Roles allow you to control what AWS resources Databricks can access and what actions it can perform. Careful use of trust and permissions policies ensures that Databricks users and clusters can only interact with explicitly authorized resources, blocking the use of unauthorized S3 buckets or external services.
- Prevents: Data writes to unauthorized AWS resources using compromised or over-permissive credentials.
Route Tables
Route Tables determine network traffic flow within your VPC. By preventing outbound routes to the internet (or only permitting necessary destinations), you control where data can travel, reducing risk that data is routed to unsafe locations.
- Prevents: Network paths to the public internet or unauthorized networks.
AWS PrivateLink
AWS PrivateLink allows private connectivity between VPCs and AWS services via encrypted, dedicated network interfaces, eliminating exposure to the public internet. This provides a secure path for Databricks control and data planes, making it harder for data to leak outside AWS.
- Prevents: Data interception or exfiltration over public networks.
Private Subnets
Private subnets have no direct route to the internet, meaning resources within cannot initiate outbound connections to the internet. This architectural barrier blocks clusters and nodes from directly sending data outside AWS.
- Prevents: Any outbound internet communication from compute resources.
KMS Keys
AWS Key Management Service (KMS) allows you to encrypt data at rest, including in S3 buckets. Even if data is accessed, it remains protected unless the attacker also has access to the encryption keys.
- Prevents: Usable exfiltration of data without compromising key material.
S3 Bucket Policies
These resource policies grant or deny access to specific S3 buckets. By limiting access only from approved sources (such as from the Databricks VPC or specific IAM roles), they ensure that even if someone attempts exfiltration, they cannot write to or copy sensitive data outside controlled buckets.
- Prevents: Writes/reads from unwanted S3 locations.
Each of these controls, individually and together, enforce a defense-in-depth approach against data exfiltration, ensuring multiple checkpoints before data could ever leave your protected environment.
Encryption is another important component of data protection. Databricks supports several encryption options, including customer managed encryption keys, key rotation, encryption at rest and in transit. Databricks-managed encryption keys are used by default and enabled out of the box, customers can also bring their own encryption keys.
Audit Logging
Audit logging is a foundational security and compliance capability, allowing organizations to track user activity, administrative actions, and system events throughout the Databricks environment. In the context of data exfiltration, audit logs play a critical role in enabling detection, investigation, and response to potential threats or inappropriate behavior.
Audit logs help answer fundamental questions such as:
- Who accessed what data and when?
- Which operations (read, write, modify, delete) were performed?
- Were there attempts to access or export sensitive data outside of policy?
By tracking these events, audit logs support both security monitoring and compliance reporting.
Databricks Audit Logging Capabilities
Databricks provides robust audit logging features at both the workspace and account level. Key capabilities include:
- Workspace-level audit logs: Capture user and system actions within a Databricks workspace.
- Account-level audit logs: Track actions across all workspaces in the account.
- Verbose audit logs: Optional, more granular event capture for deeper visibility.
- Integration with Unity Catalog system tables: Surface access, compute, query, serving, and storage logs as part of data governance and investigation workflows.
Audit logs can be delivered to a customer-designated Amazon S3 bucket in near-real time. They may be integrated directly with SIEM or security analytics systems for continuous monitoring and alerting.
Databricks Architecture
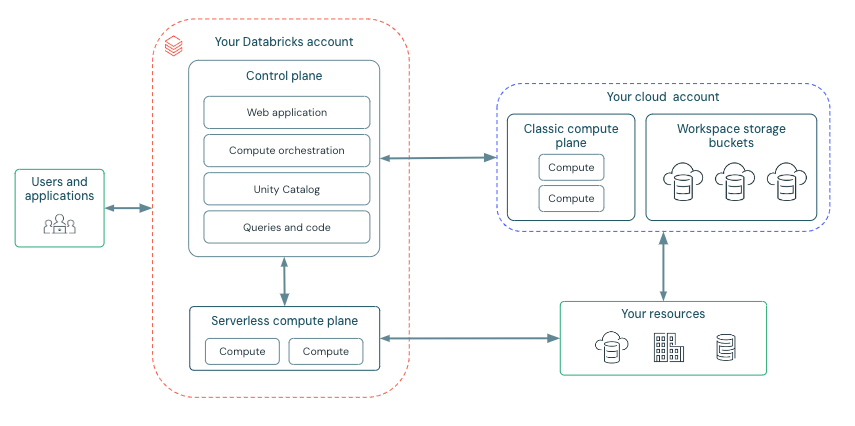
Before we begin, let’s have a quick look at the Databricks deployment architecture here:
Databricks is structured to enable secure cross-functional team collaboration while keeping a significant amount of backend services managed by Databricks so you can stay focused on your data science, data analytics, and data engineering tasks.
Databricks operates out of a control plane and a compute plane.
- The control plane includes the backend services that Databricks manages in its own AWS Cloud account. Notebook commands and many other workspace configurations are stored in the control plane and encrypted at rest.
- The compute plane, where your data is processed, has different types depending on the specific compute you are using. You can find more information about these types of compute.
- For serverless compute, the serverless compute resources run in a serverless compute plane in your Databricks account.
- For classic Databricks compute, the compute resources are in your AWS Cloud account.
High-level Architecture
Network Communication Path
To understand the security measures we aim to implement, let's examine the various ways users and applications interact with Databricks, as illustrated below.
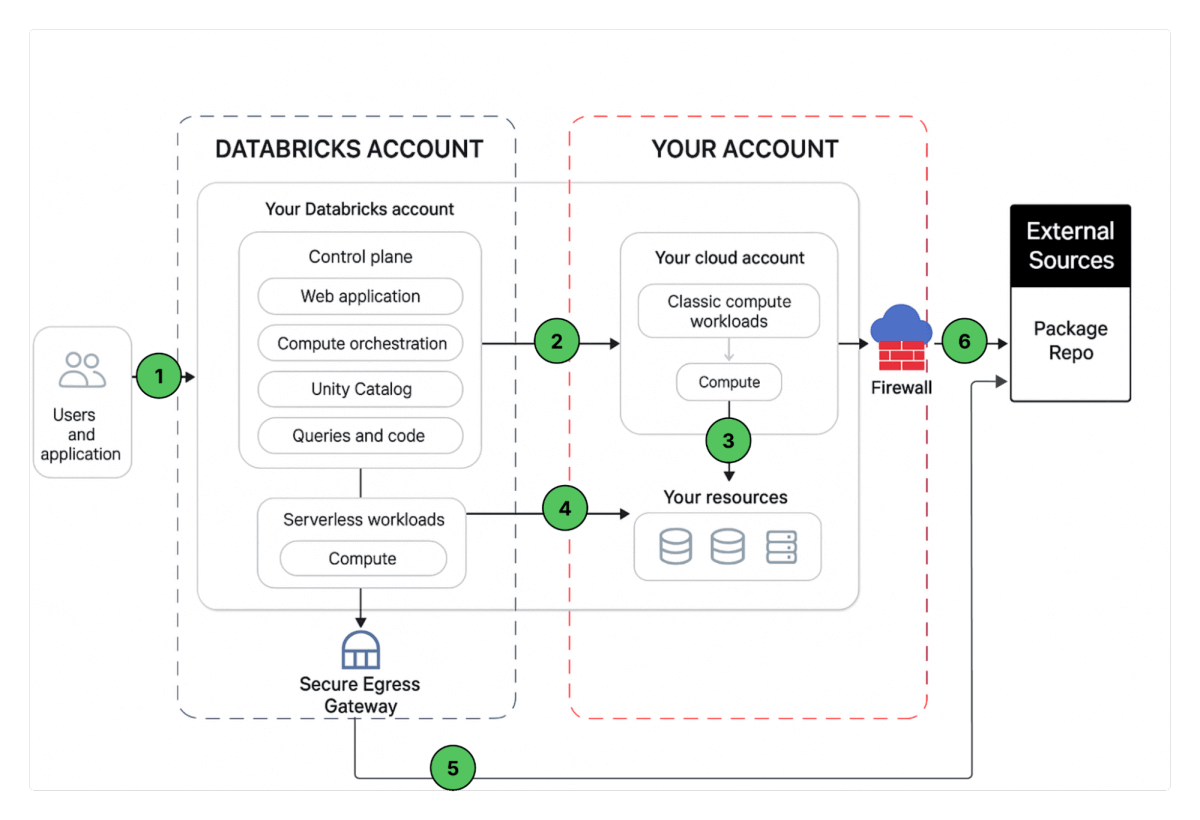
A Databricks workspace deployment includes the following network paths that you could secure.
- User or Applications to Databricks web application aka workspace or Databricks REST APIs.
- Databricks classic compute plane VPC network to the Databricks control plane service. This includes the secure cluster connectivity relay and the workspace connection for the REST API endpoints.
- Classic compute plane to your storage services (ex: S3,, Kinesis, etc).
- Serverless compute plane to to your storage services (ex: S3,, Kinesis etc).
- Secure egress from serverless compute plane via network policies (egress firewall) to external data sources e.g. package repositories like pypi or maven.
- Secure egress from classic compute plane via egress firewall to external data sources e.g. package repositories like pypi or maven.
From end users perspective 1 requires ingress controls and 2,3,4,5,6 egress controls.
In this article our focus area is to secure egress traffic from your databricks workloads, provide the reader with a prescriptive guidance on the proposed deployment architecture and while we are at it, we’ll share best practices to secure ingress (user/client into Databricks) traffic as well.
Proposed Deployment Architecture - AWS Security Reference Architecture
Deploying Databricks securely on AWS can feel complex; you need VPCs, IAM roles, private networking, Unity Catalog, and guardrails that align with enterprise security. The Databricks Security Reference Architecture (SRA) for AWS packages these best practices into ready-to-use Terraform templates, giving teams a hardened starting point for production deployments.
What it is
- Opinionated Terraform modules for secure Databricks on AWS.
- Covers networking, IAM, Unity Catalog, policies out-of-the-box.
- Acts as a security-first blueprint to accelerate adoption.
Why it matters
- Speed: Automate infra + workspace setup in minutes.
- Security: Pre-baked VPCs, private networking, audit logging.
- Scalability: Reusable patterns across accounts/workspaces.
High Level Repo structure
- aws/ → AWS infra + workspace creation.
- /modules/databricks_account/unity_catalog_metastore_creation/ → metastore creation
- aws/tf/modules/sra/credential.tf → cross-account role using external ID
- template.tfvars.example → fill your your variables
What you get
- AWS VPCs, subnets, IAM roles.
- Databricks workspaces wired to Unity Catalog.
- Hardened options: restricted egress, logging, monitoring.
How to use
- Clone the repo.
- Fill your your variables in template.tfvars.example
- Modify VPC, subnet, and name parameters where necessary
- Extend into CI/CD for repeatable enterprise deployments.
Caveats
- Point-in-time snapshot, review before upgrades.
- Not “managed” → teams own testing & adaptation.
- Requires Terraform + AWS + Databricks provider knowledge.
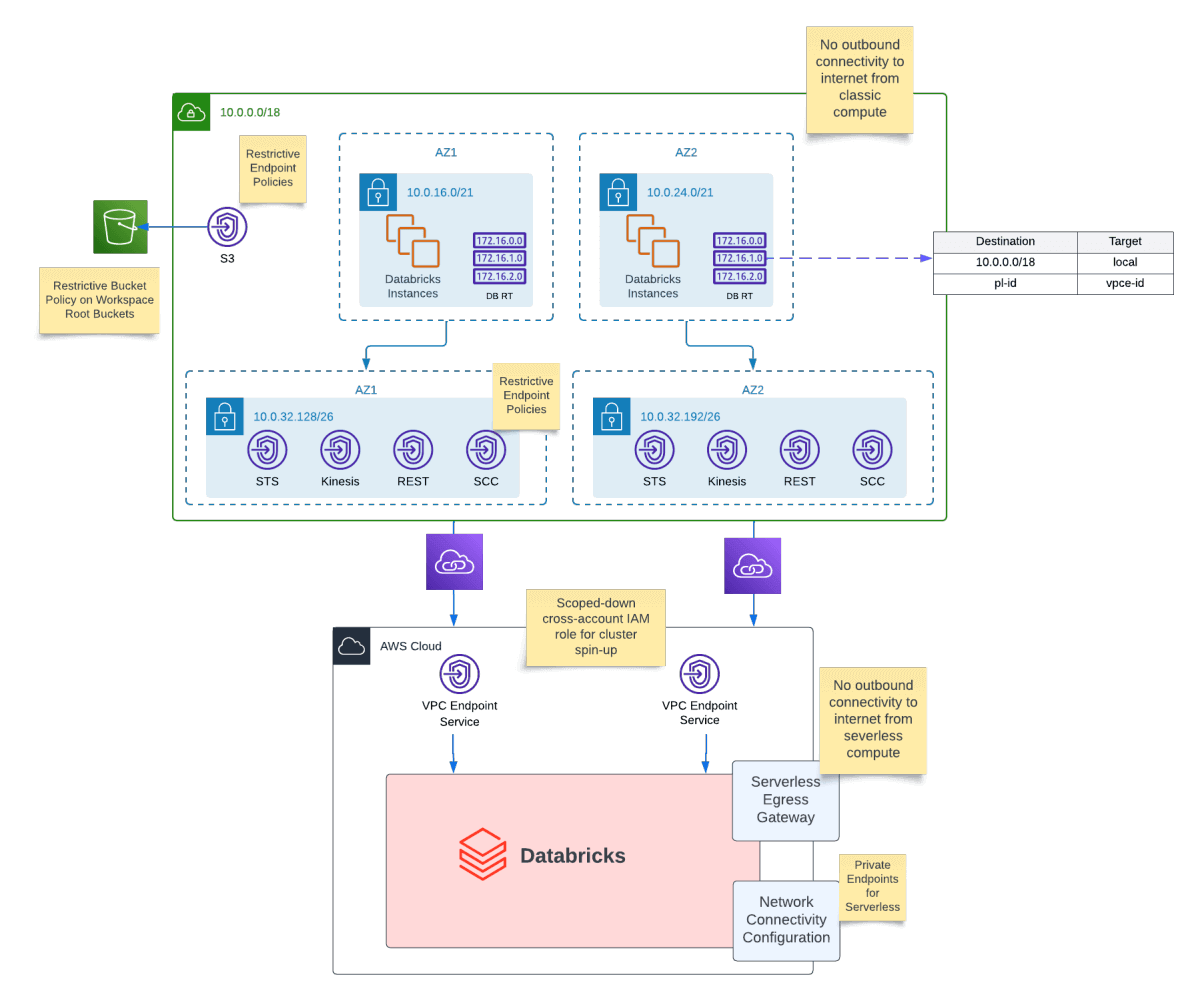
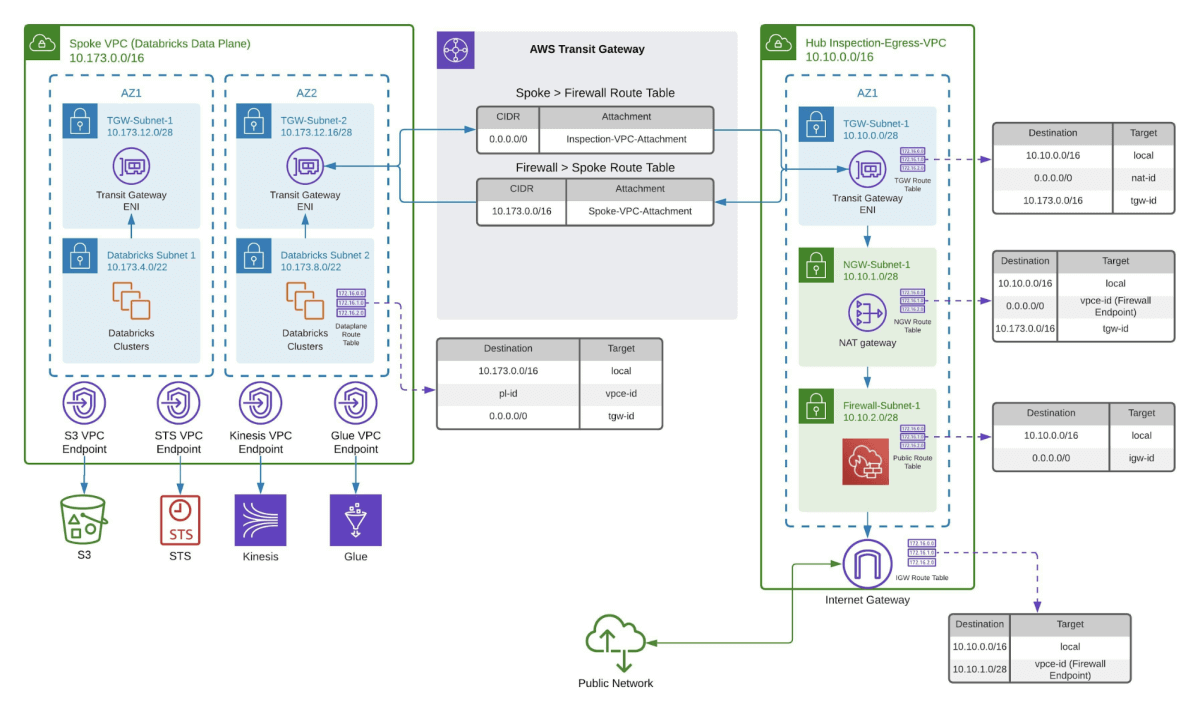
If you require access to the internet for pypi or maven we recommend the following architecture for you to scan any traffic that leaves your VPC so that you can scan any outgoing traffic. A number of AWS services can be used to scan outgoing traffic to your VPC. For example, AWS Network Firewall or Gateway Load Balancer. We recommend following AWS documentation, for example here, to get started with your AWS Network Firewall Setup.
Databricks Data Exfiltration Protection Controls
In addition to monitoring outbound traffic, implement the following controls to harden your Databricks environment against data exfiltration. Please keep in mind that some features, such as private link, are only supported in Databrick’s Enterprise tier:
SCIM Provisioning
Automate user and group lifecycle management from your IdP into Databricks.
SCIM Provisioning Guide
Single Sign-On (SSO)
Require centralized authentication via your identity provider (SAML or OIDC).
SSO Configuration
Multi-Factor Authentication (MFA)
Enforce MFA at the IdP level to add an extra layer of login security.
Multi Factor Auth
Account Console IP Access Control Lists (ACLs)
Restrict access to the Databricks account console by defining allowed IP ranges.
IP Access Lists
Private Endpoints in Network Connectivity Configuration
Ensure workspace traffic flows only through private endpoints (no public internet).
Network Connectivity Configuration
Serverless Egress Controls
Apply restrictions to limit external destinations from Databricks serverless compute.
Serverless Compute Security
Avoid Storing Production Data in DBFS
Do not persist sensitive datasets in DBFS; use secure storage (e.g., S3, ADLS).
DBFS Overview
Delta Sharing Recipient Token Lifetime
Shorten token validity for Delta Sharing to reduce exposure if leaked.
Delta Sharing Security
Isolate Sensitive Workloads into Different Networks
Use separate VPCs/subnets to logically and physically isolate workloads.
Isolate Sensitive Workloads into Different Workspaces
Deploy multiple workspaces (prod, dev, test) to enforce environment separation.
Multi-Workspace Strategy
OIDC Token Federation for CI/CD
Use OIDC federation to securely exchange short-lived tokens when CI/CD pipelines interact with Databricks.
OIDC Token Federation
Applying these controls together provides layered defense-in-depth, minimizing the risk of accidental or malicious data leakage.
Add Ons with Enhanced Security Compliance and Monitoring:
If your organization has heightened security requirements , such as needing to support HIPAA, PCI, or similarly stringent standards, consider enabling Enhanced Security Monitoring for your Databricks workloads.
This advanced feature builds on Databricks’ core security capabilities by providing deeper visibility, proactive threat detection, and additional hardening for both classic and serverless compute environments. Enhanced Security Monitoring offers benefits like Canonical Ubuntu with CIS Level 1 hardening, continuous behavior-based malware and file integrity monitoring, comprehensive malware and antivirus scanning, and detailed vulnerability reports for the host operating system.
With this functionality enabled (via the compliance security profile), security event logs, including alerts for privilege escalations, suspicious interactive shells, unauthorized outbound connections, unexpected system file changes, or potential exfiltration attempts are automatically recorded. These logs are delivered alongside standard Databricks audit logs, supplying rich, contextual information to your organization's SIEM or within Databricks itself. This makes it possible for security analysts to quickly trace and respond to anomalous or risky behavior, supporting immediate detection and rapid incident response without the need for extensive investigations.
Conclusion and Next Steps
A strong data exfiltration defense for Databricks on AWS is not a one-time setup, it requires continuous improvement. Beyond deploying architectural controls, make ongoing monitoring, rigorous auditing, and proactive change management central to your security practice. Regularly reviewing audit logs, updating access and network policies, and collaborating with security and compliance teams helps ensure that protections evolve to counter emerging threats. To deepen your strategy, review reputable resources on cloud monitoring best practices and audit logging. These references will help you maintain vigilance and resilience as your data landscape and risks grow.
Get the latest posts in your inbox
Subscribe to our blog and get the latest posts delivered to your inbox.