Hunting Anomalous Connections and Infrastructure With TLS Certificates
TLS hashes as a source for the cybersecurity threat hunting program
by Derek King
Free Edition has replaced Community Edition, offering enhanced features at no cost. Start using Free Edition today.
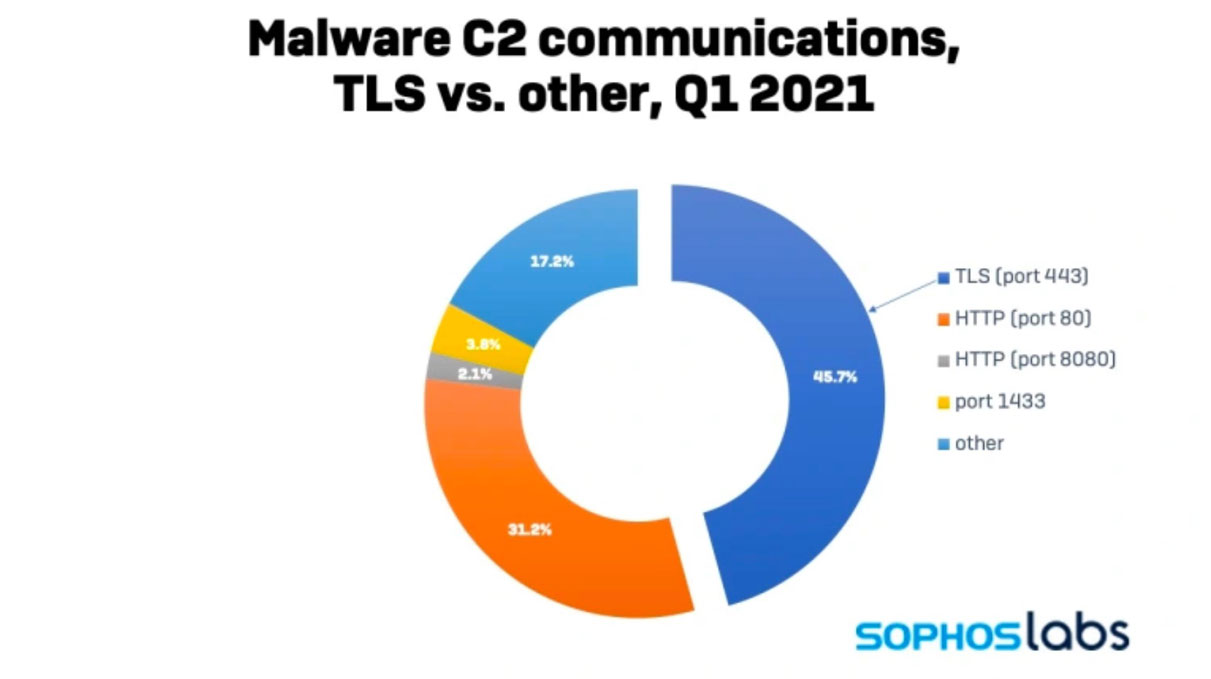
According to Sophos, 46% of all malware now uses Transport Layer Security (TLS) to conceal its communication channels. A number that has doubled in the last year alone. Malware, such as LockBit ransomware, AgentTesla and Bladabini remote access tools (RATs), has been observed using TLS for powerShell based droppers, for accessing pastebin to retrieve code and many others recently.
In this blog, we will walk through how security teams can ingest x509 certificates (found in the TLS handshake) into Delta Lake from AWS S3 storage, enrich it, and perform threat hunting techniques on it.
During the initial connection from a client to server, the TLS protocol performs a two-phase handshake, whereby the web server proves its identity to the client by way of information held in the x509 certificate. Following this, both parties agree on a number of algorithms, then generate and exchange symmetric keys, which are subsequently used to transmit encrypted data.
For all practical purposes x509 certificates are totally unique and can be identified using hashing algorithms (commonly SHA1, SHA256 and MD5) called fingerprints. The nature of hashing makes them great threat indicators and are commonly used in threat intelligence feeds to represent objects. Since the information within them is used for cryptographic key material (agreement, exchange, creation etc), they themselves are encoded but not encrypted and therefore, can be read.
Capturing, storing and analyzing network traffic is a challenging task. However, landing it into cheap cloud object storage, processing it at scale with Databricks and only keeping the interesting bits could be a valuable workflow for security analysts and threat hunters. If we can identify suspicious connections, we have an opportunity to create indicators of compromise (iocs) and have our SIEM security tools help to prevent further malicious activity downstream.
About the data sets
We are using x509 data collected from a network scan, and alongside it, we will use the Cisco Umbrella top 1 million list and the SSL blacklist produced by abuse.ch as lookups.
One of the best places within an enterprise network to get hold of certificate data is off the wire using packet capture techniques. Zeek, TCPDump and Wireshark are all good examples.
If you are not aware of the cyber threat hunting tool SSLblacklist, it is run by abuse.ch with the goal of detecting malicious SSL connections. The Cisco Umbrella top 1m are the most popular DNS lookups on the planet as seen by Cisco. We will use this to demonstrate filtering and lookup techniques. If you or your hunt team want to follow along with the notebook and data you can import the accompanying notebook.
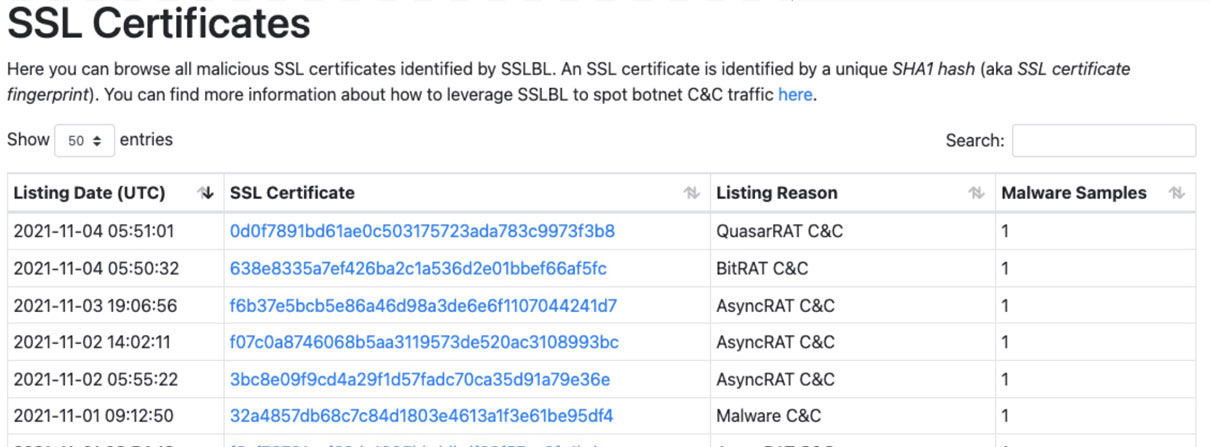
Source:https://sslbl.abuse.ch
Ingesting the data sets
For simplicity, if you are following along at home, we will be using Delta Lake batch capability to ingest the data from an AWS S3 bucket to a bronze table, refine and enrich it into a silver table (medallion architecture). However, you can upgrade your experience in real-world applications using structured streaming!
We’ll focus on the blacklist and umbrella files first, followed by x509 certificate data.
rawTop1mDF = read_batch(spark, top1m_file, format='csv', schema=alexa_schema)
alexaTop1mBronzeWriter = create_batch_writer(spark=spark, df=rawTop1mDF, mode='overwrite')
alexaTop1mBronzeWriter.saveAsTable(databaseName + ".alexaTop1m_bronze")
bronzeTop1mDF = spark.table(databaseName + ".alexaTop1m_bronze")
bronzeTop1mDF = bronzeTop1mDF.filter(~bronzeTop1mDF.alexa_top_host.rlike('localhost')).drop("RecordNumber")
display(bronzeTop1mDF)
alexaTop1mSilverWriter = create_batch_writer(spark=spark, df=bronzeTop1mDF, mode='overwrite')
alexaTop1mSilverWriter.saveAsTable(databaseName + ".alexaTop1m_silver")
The above code snippets read the csv file from an s3 bucket, writes it directly to the bronze table unaltered, then reads the bronze delta table, makes transformations and writes it to the silver table. That’s the top 1 million data ready for use!
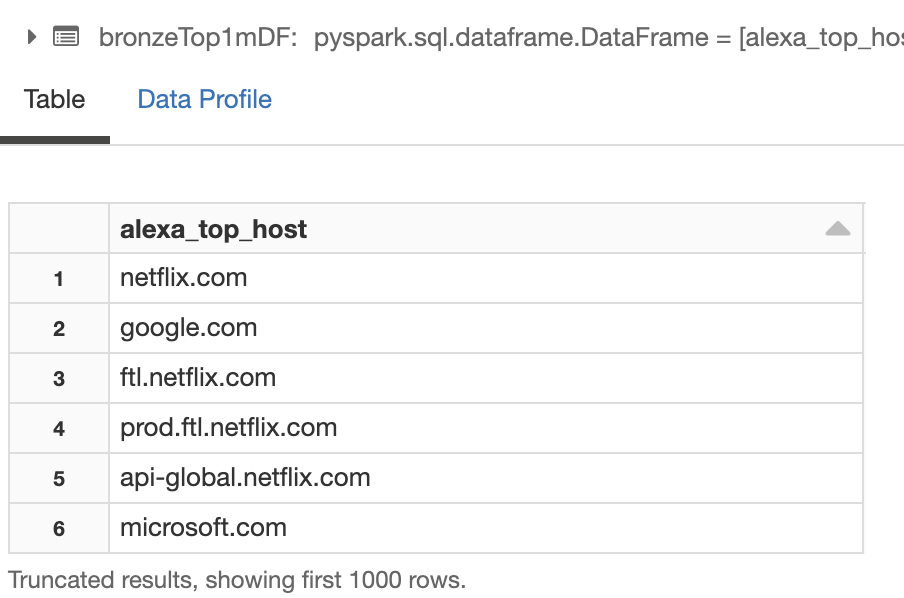
Resulting Dataframe
Next we follow the same format for the SSL blacklist data
rawBlackListDF = read_batch(spark, blacklist_file, format='csv')
rawBlackListDF = rawBlackListDF.withColumnRenamed(, # Write to Bronze Table
sslBlBronzeWriter = create_batch_writer(spark=spark, df=rawBlackListDF, mode='overwrite')
sslBlBronzeWriter.saveAsTable(databaseName + ".sslBlacklist_bronze")
bronzeBlackListDF = spark.table(databaseName + ".sslBlackList_bronze")
bronzeBlackListDF = bronzeBlackListDF.select(*(col(x).alias('sslbl_' + x) for x in bronzeBlackListDF.columns)
BlackListSilverWriter = create_batch_writer(spark=spark, df=bronzeBlackListDF, mode='overwrite')
BlackListSilverWriter.saveAsTable(databaseName + ".sslBlackList_silver")
The above process is the same, as for the top 1 million file presented below. Our transformation simply prefixes all columns with ‘sslbl_’ so it is easily identified later.
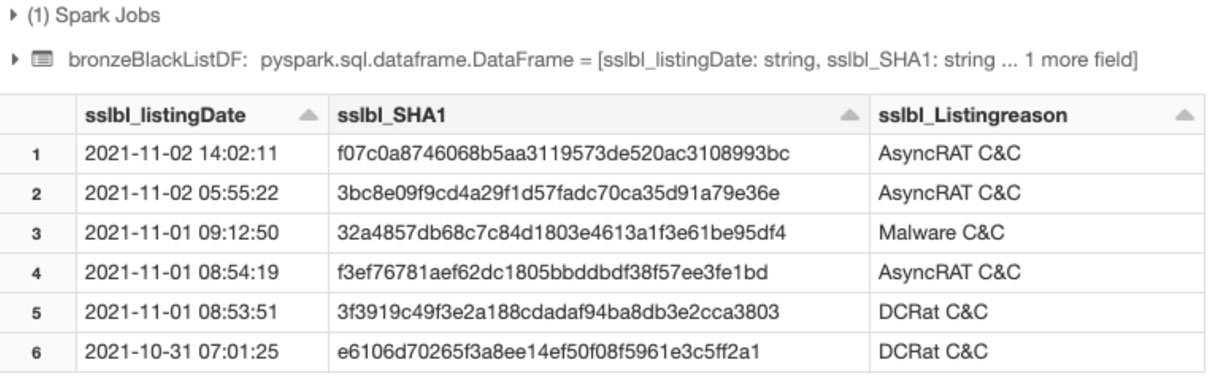
Resulting sslblacklist dataframe
Next we ingest the x509 certificate data using exactly the same methodologies. Here’s how that dataframe looks after ingestion and transformation into the silver table.

X509 certificates are complex and there are many fields available. Some of the most interesting for our initial purposes are;
- subject, issuer, common_name, valid to/from fields, dest_ip, dest_port, rdns
Analyze the data
Looking for certificates of interest can be done in many ways. We’ll begin by looking for distinct values in the issuer field.
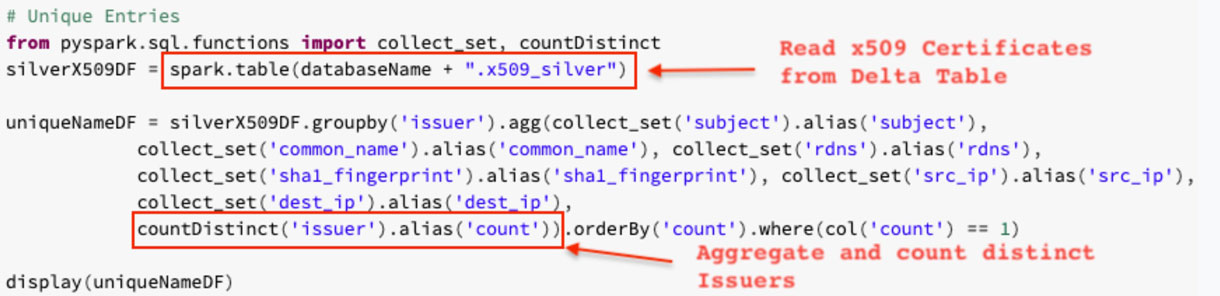
If you are new to pyspark, it is a python API for Apache Spark. The above search makes use of collect_set, countDistinct, agg, and groupBy. You can read more about those in the links.
A hypothesis we have is that when certificates are either temporary, self-signed or otherwise not used for genuine purposes, the issuer field tends to have limited detail. Let’s create a search looking at the length of that field.

withColumn adds a new column, after evaluating the given expression.

The top entry has the shortest length and has unique subject and issuer fields. This is a good candidate for some OSINT!
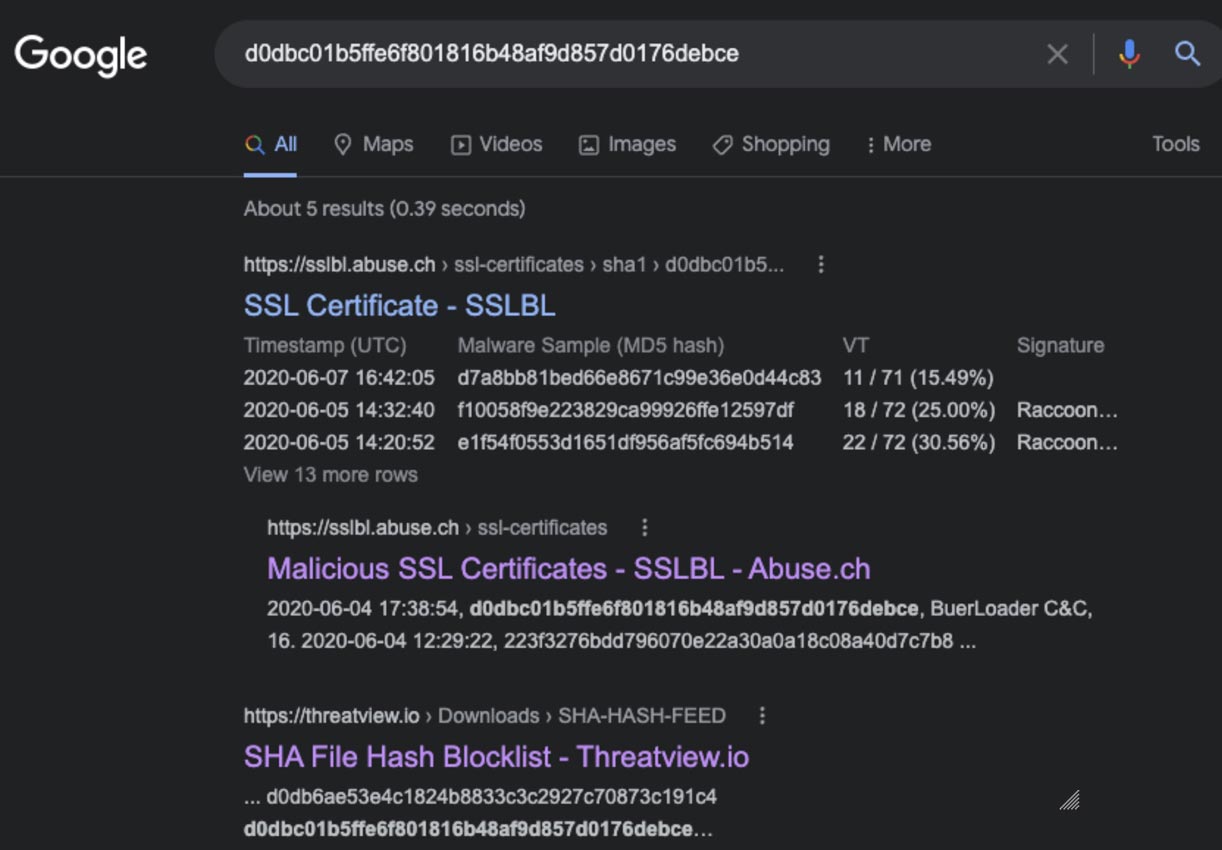
A google search shows a number of hits that believe this certificate is or has been used on malicious websites. This hash is a great candidate to pivot from and explore further in our network.
Let's now use our ssl blacklist table to correlate with known malicious hashes.
isSSLBlackListedDF = silverX509DF.select(
"sslbl_Listingreason","common_name", "country", "dest_ip","rdns","issuer",
"sha1_fingerprint", "not_valid_before", "not_valid_after"
).filter(silverX509DF.sslbl_SHA1 != 'null')
display(isSSLBlackListedDF)

This search raises some interesting findings. The top four entries show hits for a number of different malware families' command and control infrastructure. We also see the same sha1 fingerprint being used for ransomware command and control, using different IP addresses and DNS names. There could be a number of reasons for this but the observation would be that adversary infrastructure is moving around over time. First seen, last seen work should be done using the threat data’s listing date and other techniques such as passive DNS lookups to further understand this and gain more situational awareness. New information discovered here should also be used to pivot back into an organisation for any other signs of communication with any of these hosts or IP addresses.
Finally, a great technique for hunting command and control communication is to use a Shannon entropy calculation to look for randomized strings.
"Calculates the Shannon entropy of a string"
try:
# get probability of chars in string
prob = [ float(string.count(c)) / len(string) for c in dict.fromkeys(list(string)) ]
# calculate the entropy
entropy = - sum([ p * math.log(p) / math.log(2.0) for p in prob ])
except Exception as e:
print(e)
entropy = -1
return entropy
entropy_udf = udf(entropy, StringType())
entropyDF = silverX509DF.where(length(col("subject")) 15).select(
""common_name","subject","issuer","subject_alternative_names","sha1_fingerprint"
).withColumn("entropy_score",
entropy_udf(col('common_name'))).orderBy(col("entropy_score").desc()).where(col('entropy_score') > 1.5)
display(entropyDF)
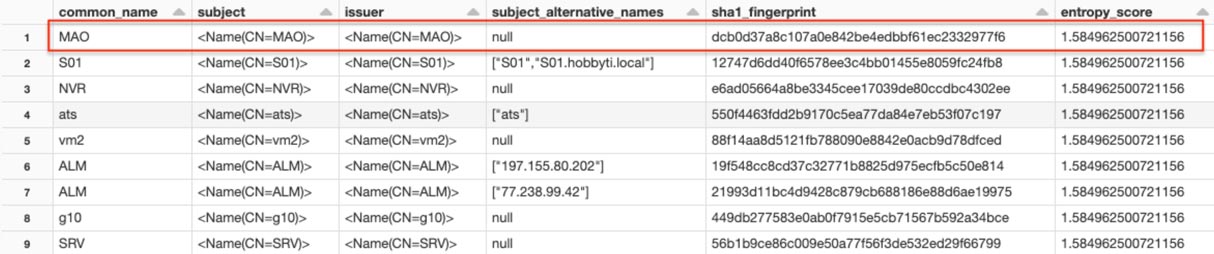
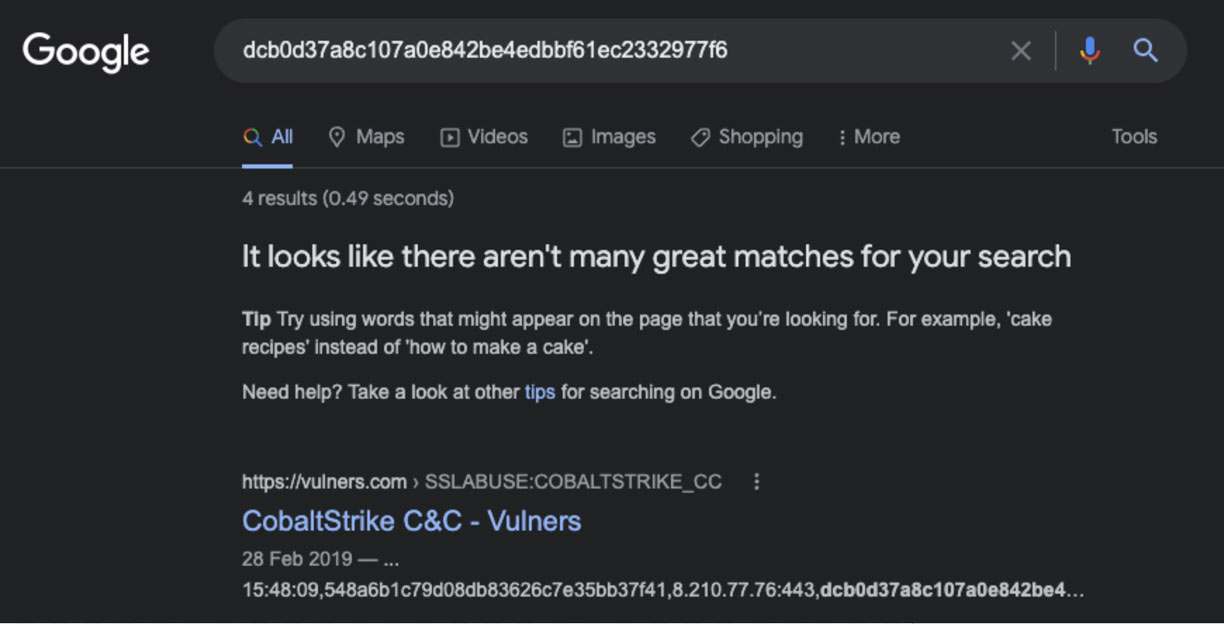
As the saying goes, ‘the internet is a bad place’ and ‘math is a bad mistress’! Our initial search included all certificates, which produces a lot of noise due to the nature of the fields content. Experimenting further, we learned from our earlier search and focused only on those with a subject length of less than fifteen characters, and surfaced only the highest entropy of that data set. The resulting nine entries can be manually googled, or further automation could be applied. The top entry in this scenario is of interest, as this appears to be used as part of the CobaltStrike exploit kit.
Further work
This walk through has demonstrated some techniques we can use to identify suspicious or malicious traffic using simple unique properties of x509 certificates. Further exploration using machine learning techniques may also provide benefits.
Conclusion
Analyzing certificates for unusual properties, or against known threat data can identify infrastructure known to host malicious software. It can be used as an initial pivot point to gather further information that can be used to search for signs of compromise. However, since the certificate identifies a host and not the content it serves, it cannot provide high confidence alerts alone.
Before being eligible for operationalization in a security operations centre (soc), the initial indicators need to be triaged further. Data from other internal and external sources such as, firewalls, passive DNS, VirusTotal, who is and also process creation events from endpoints should be used.
Let us know at [email protected] how you think processing TLS/x509 data either in an enterprise or more passively on the internet can be used to track adversaries and their infrastructure. If you are not already a Databricks customer, feel free to spin up a community edition.
Get the latest posts in your inbox
Subscribe to our blog and get the latest posts delivered to your inbox.