Databricks Workflows Through Terraform
Part 1 of the blog series on deploying Workflows through Terraform. How to create complex jobs / workflows from scratch in Databricks using Terraform Infrastructure-as-Code.
Orchestrating data munging processes through Databricks Workflows UI is an easy and straightforward affair. Select the code, choose compute, define dependencies between tasks, and schedule the job / workflow. If needed, trigger it immediately. That's it. Small teams often rave at the speed with which they can build their data engineering and machine learning pipelines using Workflows.
But then, one fine day, these small teams grow. And with that growth, their orchestration needs evolve as well. Here are a few examples of the new scenarios and challenges they encounter:
- Continuous Integration / Continuous Delivery (CI/CD)
- How to replicate a job from one Databricks environment to another?
- How to ensure the workflows remain in sync? This is especially important for Disaster Recovery scenarios.
- When a workflow configuration is changed, how to roll out the changes to its replicas across the environments?
- Application development and maintenance
- How to version control and track changes to a Workflow over development cycles?
- How to use a Workflow as a 'template' and fork more complex Workflows from it?
- How to make Workflows more modular, and allow different teams to own different parts of it?
The solution to these problems lies in translating a Workflow's configuration into 'code' and version-controlling it using a repository. Developers can then create forks and branches from the repo to generate new (or update existing) workflows, and deploy it through CI/CD automation. If it is modular enough, different teams can work on different modules of a Workflow at the same time. Sounds tempting, but what exactly does Workflow as Code look like? To understand that, we will have to first take a look at the moving parts of a Databricks workflow.
Please note that traditionally Jobs has been a widely used, out-of-the-box orchestration engine for Databricks. The Workflows feature (launched not too long ago) took the Jobs functionality a yard further and evolved it into a family of orchestration tooling. Under Workflows, now we have Jobs, Delta Live Tables pipeline orchestration, advanced notification capabilities, a dashboard for execution history analytics, and a rapidly expanding list of features. For historical compatibility, the keywords Workflows and Jobs have been used interchangeably in this blog.
Databricks Workflows
Below is an example of a typical Databricks Workflow, consisting of multiple, interdependent tasks underneath it.
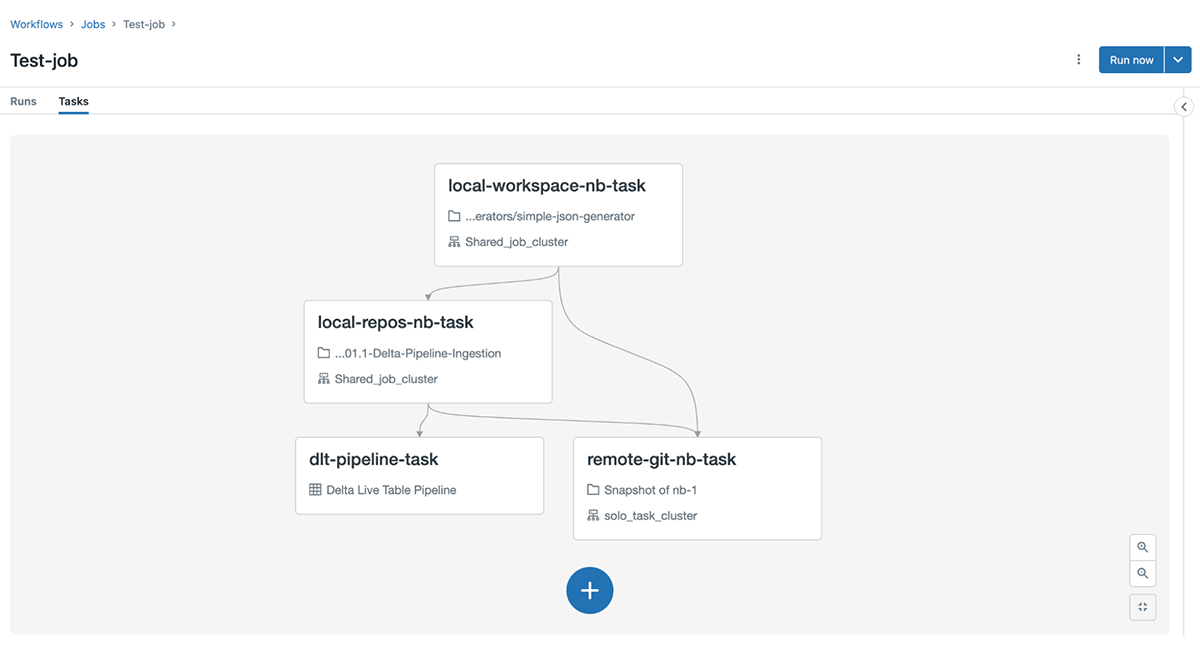
Though the Tasks tab displays the relationships between the tasks very elegantly, there is a lot of coordination and provisioning happening behind the scenes. The need to efficiently manage this coordination and provisioning becomes quite pronounced for organizations working at scale, and with numerous teams. To understand the degree of this challenge, we need to understand what a Workflow looks like under-the-hood.
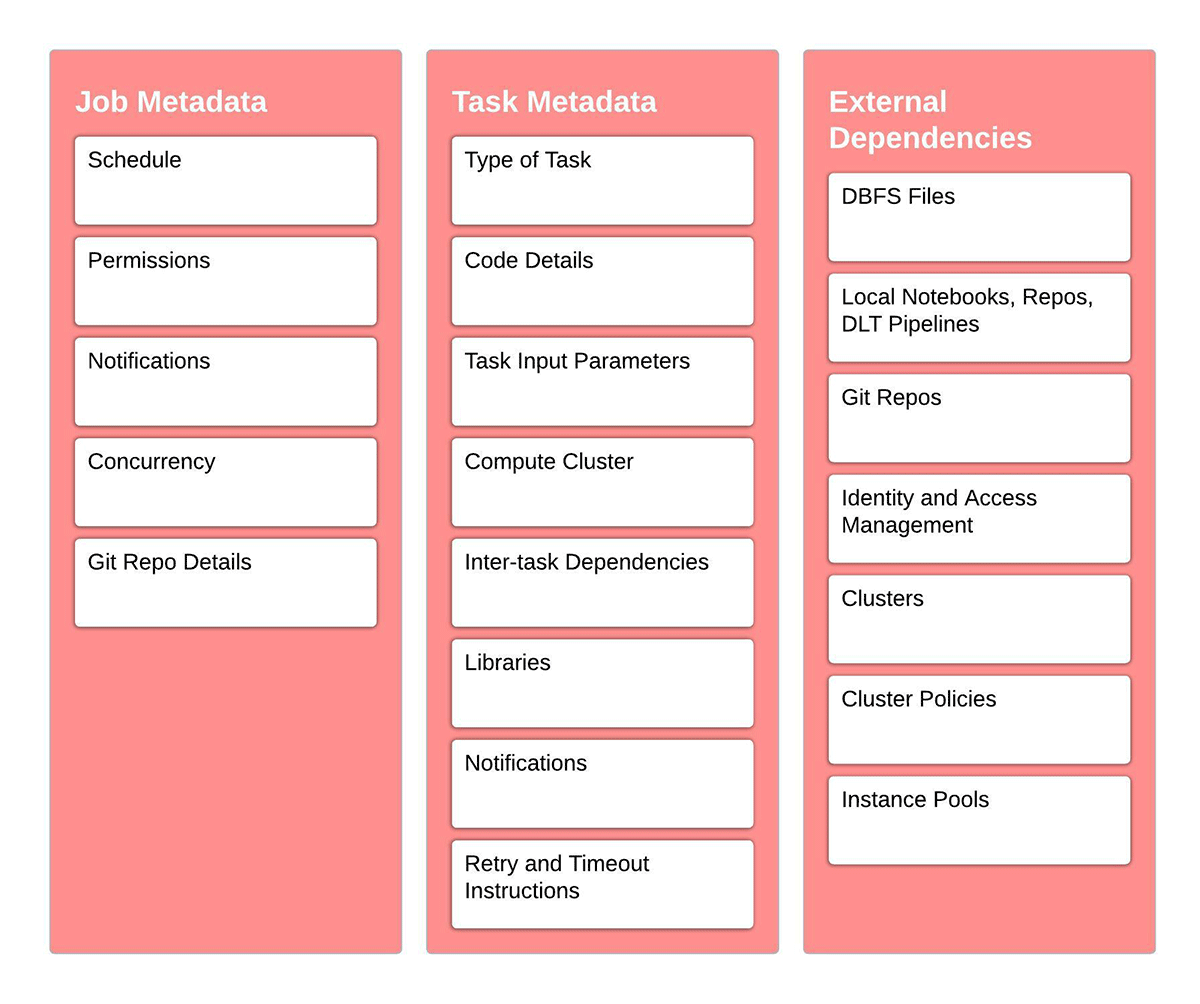
Workflows are formed of one or many tasks which implement business logic. Each task needs access to code. This code gets executed on compute clusters. Clusters, in turn, need details of Databricks runtime, instance types and libraries to be installed. What happens when a task fails? Who is notified? Do we need to implement a retry feature? Further, a Job needs metadata instructing Databricks how it will be triggered. It can get kick-started manually or through an external trigger (time-based or event-based). It also needs to know how many concurrent executions are allowed and permissions around who can manage it.
It's evident that a job as a whole has plenty of dependencies and it needs a bunch of instructions to start with. The below lists show the various resources and instructions we need to supply to a Workflow / Job:
The Workflows UI provides a visual and easy-to-interpret way of providing these instructions. Many teams however want a 'code version' of this workflow, which can be version-controlled and deployed into multiple environments. They also want to modularize this code, so that its components evolve independently of each other. For example, we could maintain a module to create a specific type of cluster, say my_preferred_job_cluster_specifications. While provisioning a Job, we can just feed in a reference to this specification object, instead of providing the cluster config metadata explicitly every time.
What's the solution? Enter Infrastructure-as-code (IaC) and Terraform.
Terraform and IaC
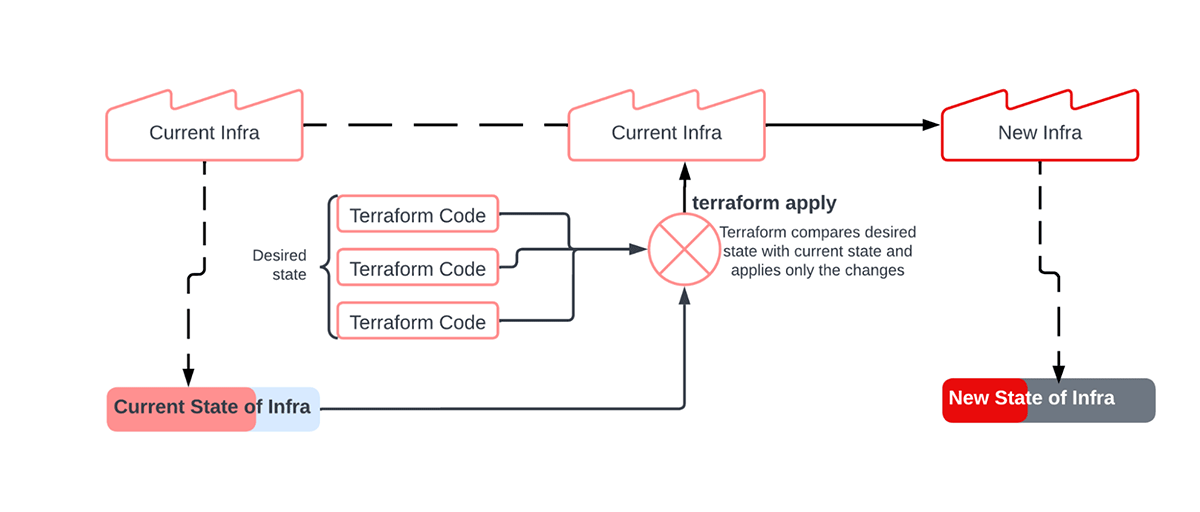
Normally, infrastructure is provisioned through a console / UI. However, when Infrastructure is deployed through a written set of instructions, the paradigm is known as Infrastructure-as-code (IaC). Hashicorp's Terraform is a very popular tool to make IaC happen in a scalable way. It allows developers or infra engineers to represent the desired state of their infrastructure through code, which when executed, generates the infrastructure. The tool then 'remembers' the current state of infrastructure by preserving a state file. When new IaC instructions are provided to Terraform to modify the infrastructure, it compares the 'desired state' with the stored 'current state' and deploys only the changes. This incremental cycle is better explained through the below image.
Infra at Databricks – Is it a bird or an airplane?
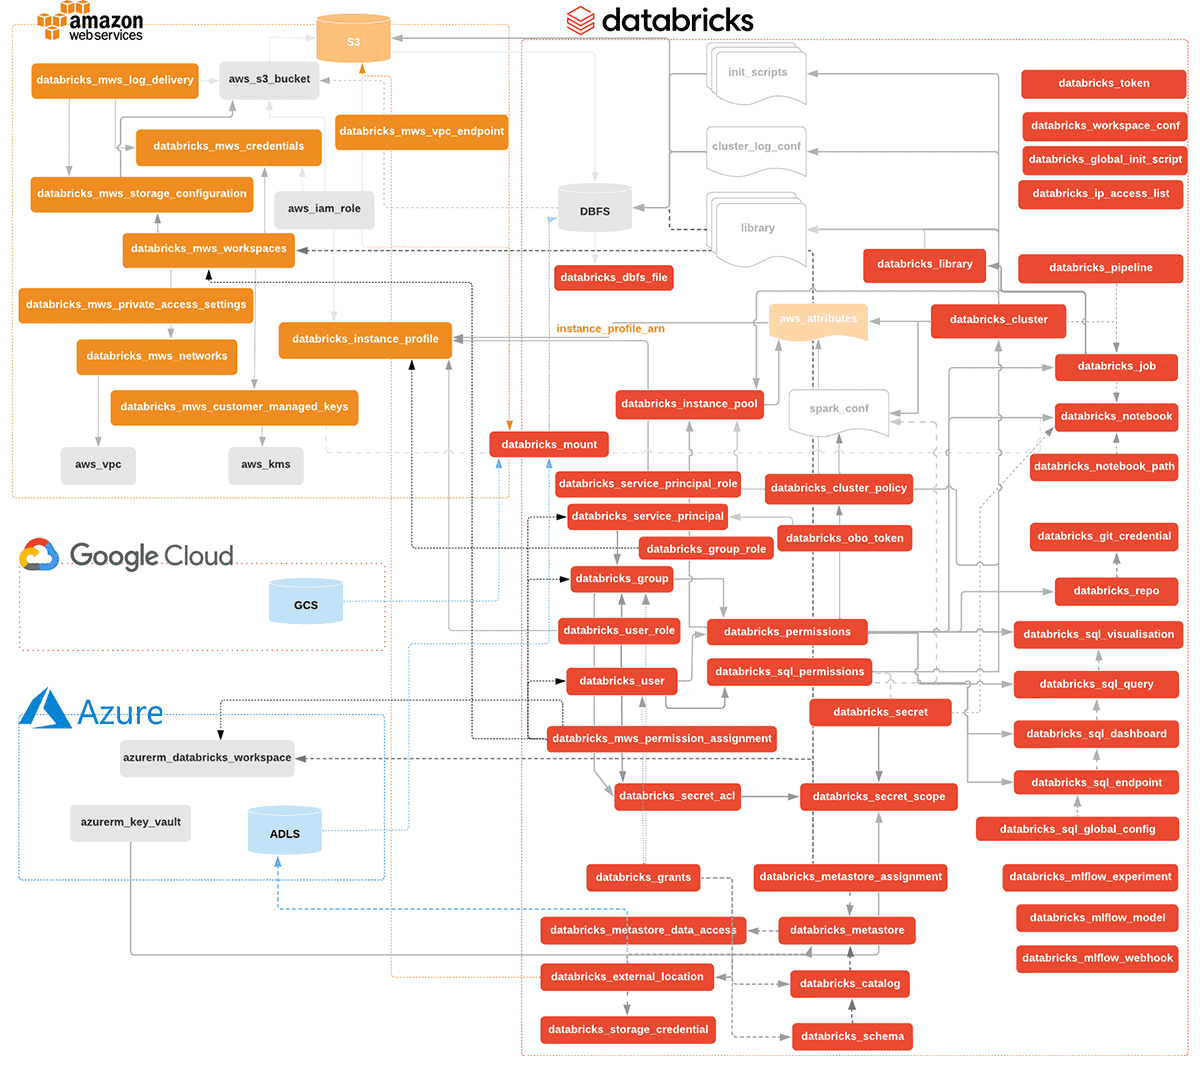
What does Infrastructure really mean in the context of Databricks – Clusters, Notebooks, and/or Workspace? Actually, it's all of that, and then some more. Databricks objects such as users, notebooks, jobs, clusters, workspaces, repos, secrets etc. are all referred to as infrastructure in Terraform parlance. A better term for them is 'resources'. Terraform Databricks Provider is a plug-in which provides templates to provision such resources inside Databricks. Starting with the deployment of Databricks itself, practically every resource inside Databricks can be provisioned and managed through this plug-in. The resource named shared_autoscaling below is an example of a Databricks Cluster resource specified in a language called HashiCorp Language (HCL) (or Terraform language). For this blog, the code snippets displayed pertain to provisioning infrastructure on AWS.
The complete list and documentation for all such resources, their input arguments and outputs can be obtained from the Terraform Provider registry. The diagram below maps the present state of Terraform resources for Databricks on AWS, Azure and GCP.
Deploying a Multi-Task Job resource through Terraform
The documentation for creating a Multi-Task Job (MTJ) through Terraform can be found on the databricks_job resource page. In practice, the number of moving parts for a production Job could be many, yet necessary. So, let's do a deep dive into the process of creating a Multi-Task Job. The diagram below lays out a few key components of such a Job:
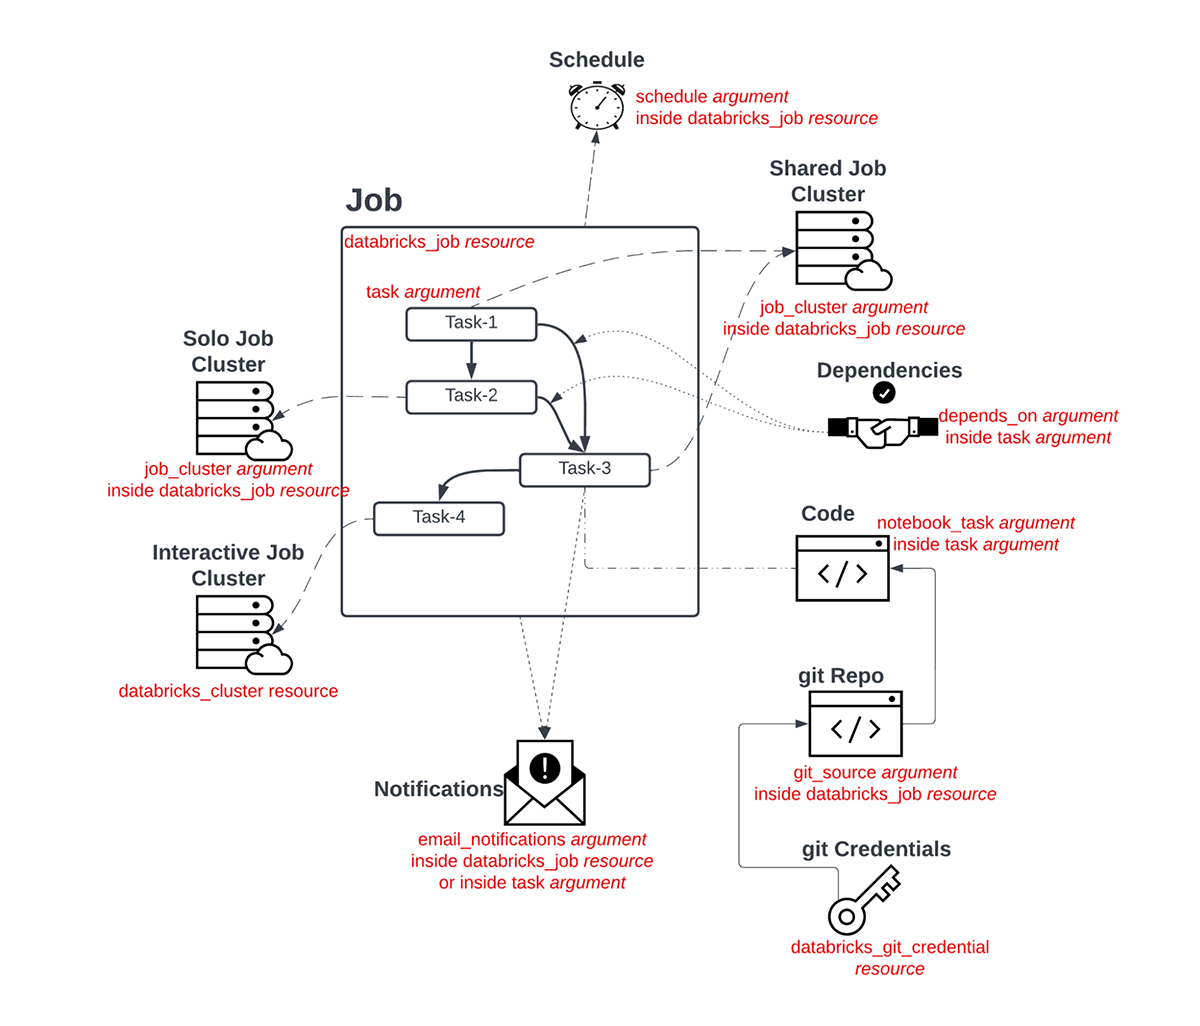
These components get unrolled and deployed in three steps:
- Provider set up and Authentication with Databricks
- Resolve all upstream resource dependencies e.g. Notebooks, Repos, Interactive clusters, Git credentials, Init scripts etc.
- Creation of components of the job e.g. Ephemeral jobs clusters, tasks, task dependencies, notification details, schedule, retry policies etc.
Setup and Authentication with Databricks
The first step to use the Terraform Databricks provider is to add its binaries to the working directory for the project. For this, create a <my_provider>.tf file in the working directory with the following content (choose the preferred provider version from its release history) and execute the command terraform init:
To ensure that Terraform is able to authenticate with the Databricks workspace and provision infra, a file <my-databricks-token>.tf with token details needs to be created in the working folder.
You can refer to this documentation to generate a Databricks API token. Other ways of configuring authentication can be found here. Please be aware that hard coding any credentials in plain text is not something that is recommended. We have done this only for demonstration purposes. We strongly recommend using a Terraform backend that supports encryption. You can use environment variables, ~/.databrickscfg file, encrypted .tfvars files or a secret store of your choice (Hashicorp Vault, AWS Secrets Manager, AWS Param Store, Azure Key Vault).
Deploy upstream resource dependencies
With the Databricks provider binaries downloaded and token file configured, Terraform is now ready to deploy resources in the workspace mentioned in the token file. It's important now to provision any resources the job will be dependent on, for example:
- If any task in a job uses an interactive cluster, the cluster needs to be deployed first. This enables the job's terraform code to fetch the id of the interactive cluster and plug it into the existing_cluster_id argument.
- If any task in a job uses code from the Workspace or from Databricks Repo, the Notebook / Repo needs to be deployed first. Note that Repos and Notebooks may themselves have upstream dependencies on Identity and Access Management and Git credentials. Provision them beforehand.
- Cluster policies, Instance Pools and Delta Live Table pipelines are upstream resource dependencies. Have them resolved in advance if you are using them.
Deploy job components
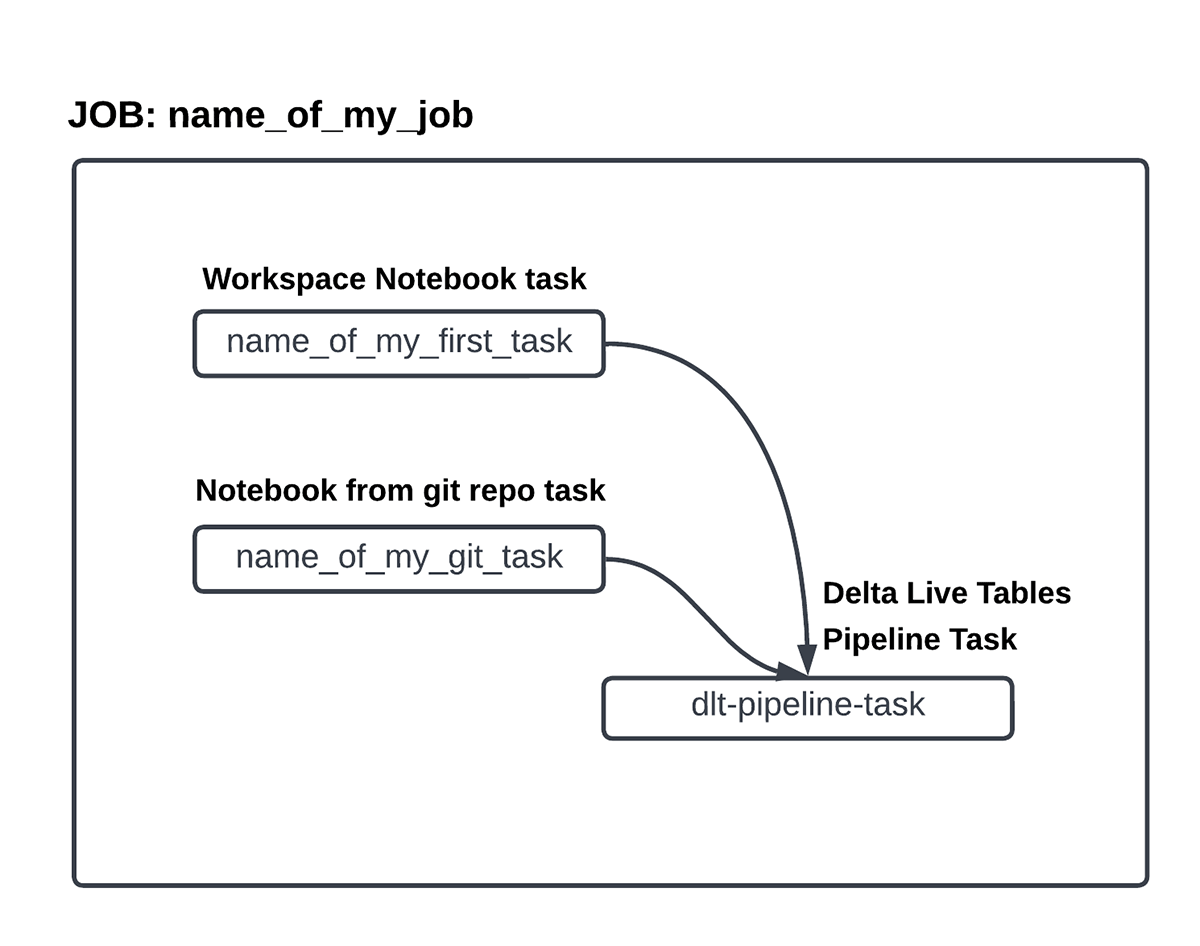
Once the upstream dependencies are all set, the Jobs resource is ready to deploy. The configuration for a databricks_job resource can be done as instructed in the Terraform registry. Some examples of configured multi-task jobs can be found in this github repo. Let's now go ahead and try to create the Terraform template for a job. Once finished, the Workflow should resemble the diagram below.
We begin by creating a container for databricks_job resource. Notice how the Job level parameters have been supplied here e.g. schedule, maximum concurrent runs.
The next step is to create the blocks for Job clusters, which are basically ephemeral clusters tied to the life of this Job. In contrast, interactive clusters are created in advance and may be shared with resources outside the purview of this Job.
Let's create the Task blocks now. Here's a task which uses a workspace notebook and the shared jobs cluster defined above. Note the usage of base_parameters which supply input arguments to a Task.
Here's a task which points to a remote git repo (defined in the Job container). For computation, this task uses an interactive cluster. Note the usage of pip libraries and the configuration for timeouts and retries here.
Finally, below is a task block making use of a Delta Live Tables pipeline. The pipeline needs to be created separately.
The permutations and combinations of task-types, cluster types and other attributes are numerous. But, hopefully the above patterns help in making sense of how to construct a complex multi-task job/workflow using these building blocks. Once the Terraform code is written, the below commands can be made use of to work with the resources.
terraform init |
Prepare your working directory for other commands |
terraform validate |
Check whether the configuration is valid |
terraform plan |
Show changes required by the current configuration |
terraform apply |
Create or update infrastructure |
terraform destroy |
Destroy previously-created infrastructure |
Conclusion
Terraform is a powerful IaC tool to deploy resources in Databricks. Stitching up many of these resources to roll-up into a multi-task workflow allows teams a lot of flexibility in creating modularized templates for jobs, tasks and clusters. They can version control, share, reuse and quickly deploy these templates throughout their organization. Though creating a workflow from scratch, as shown through this blog, can be straightforward for developers comfortable with Terraform, data engineers and data scientists may still prefer creating workflows through the UI. In such scenarios, Terraform developers may 'inherit' a workflow which has already been created. What does an 'inherited workflow' look like? Can we reuse and evolve it further? We will discuss these scenarios in the next blog in this series.
Get started
Get the latest posts in your inbox
Subscribe to our blog and get the latest posts delivered to your inbox.